Book Appointments Instantly with Google Forms & Voice Agent
On this page
- Video Tutorial
- Step 1: Create an Agent and Set Up the Appointment Scheduling Use Case
- Step 2: Buy a Phone Number
- Step 3: Connect Google Calendar
- Step 4: Copy the Google Form Template
- Step 5: Connect a Google Form to your Voice Agent
- Step 6: Test the Phone Call by a Submission
- Step 7: (Optional) Document All Call Activities on a Google Sheet
- Step 8: (Optional) Check the Call Logs
- Congratulations
At the end of this tutorial, you will be able to:
- 👍 Be compliant with the latest TCPA/FCC one-to-one rule using Google Forms
- 📋 Collect information from your customers using a Google Forms
- 📞 Immediately call inbound leads after they submit the form
- 📅 On the call, SeaChat voice agent will prequalify leads and book appointments into your calendar
- 📊 Track all calls made by the voice agent in a Google Sheet
- 🚀 Book 10x more appointments, serve customers 24/7 without needing to work more or hire more people
Calling right after form submission is crucial to lock down a meeting while the lead is still engaged and interested, increasing the chances of successful appointment scheduling.
In this tutorial, we will walk you through every step you need to connect your Google Form with SeaChat Voice Agent.
Note: If you use other types of forms such as web forms, Jotform, or any other form, please contact us at seachat@seasalt.ai. We will help you set up the same appointment booking integration.
Video Tutorial
Step 1: Create an Agent and Set Up the Appointment Scheduling Use Case
First, you need to create a SeaChat voice agent. This agent will be responsible for making calls, prequalifying leads, and booking appointments. For details on how to set up your voice agent, please refer to our Create a New Agent guide. For this Google Forms integration, you will want to use the “Appointment Scheduling” use case, which we have a step by step guide on how to set up in this video.
Step 2: Buy a Phone Number
Next, purchase a phone number through SeaChat. This number will be used by your voice agent to make calls to the customers who submit the Google Form.
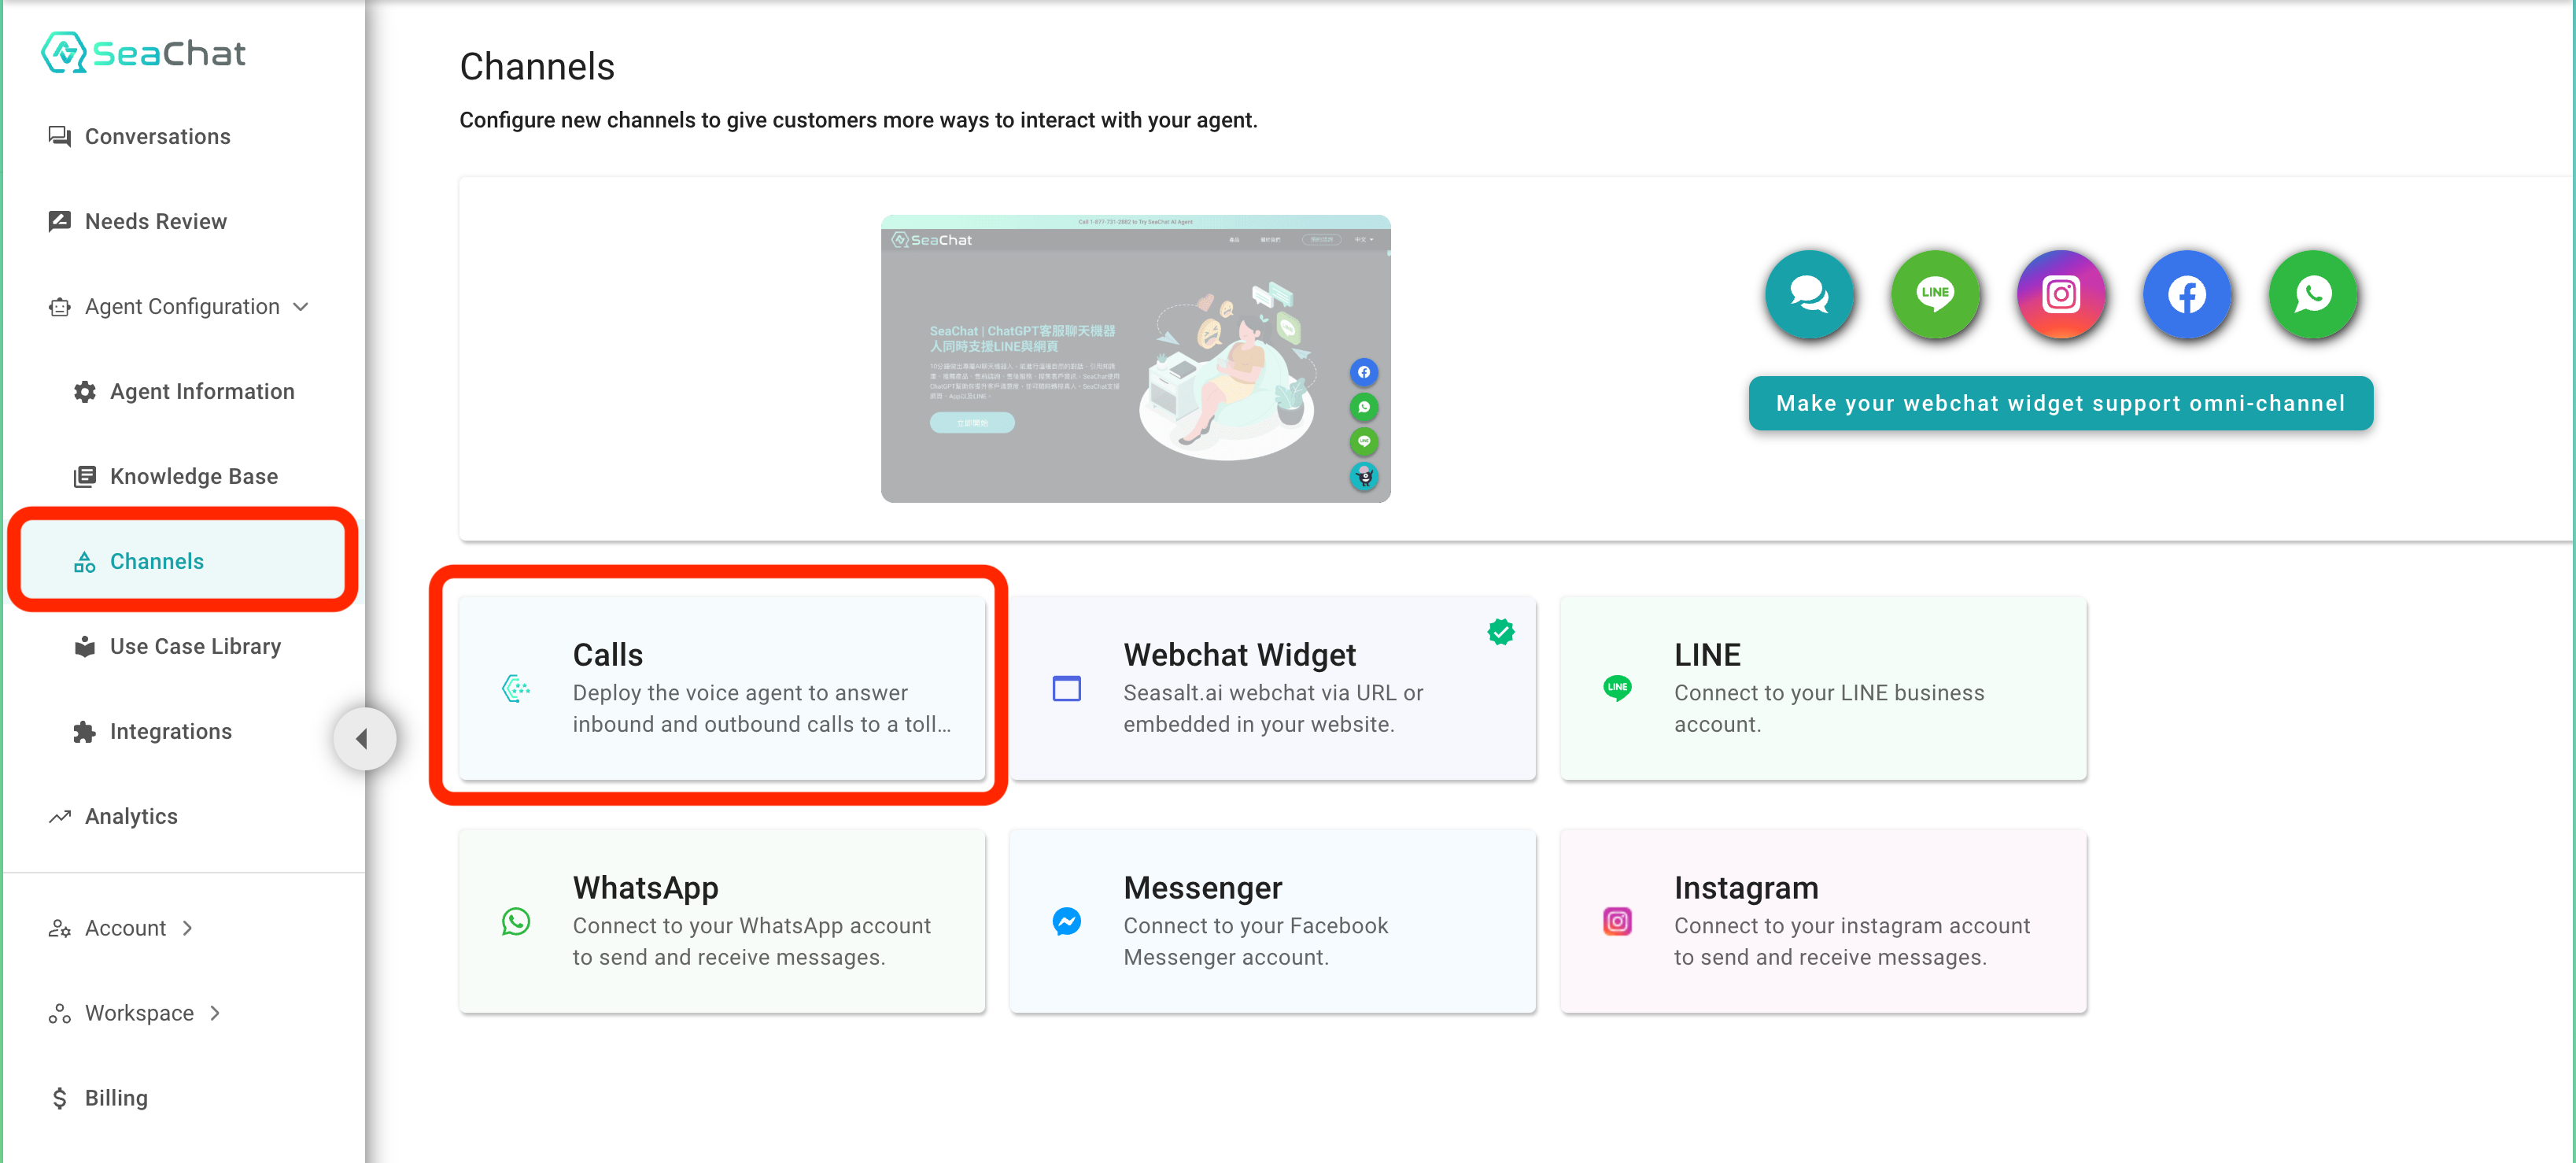
You can buy a phone number directly on SeaChat
The phone number is $3 per month and you can buy it directly on SeaChat and pay with your SeaChat monthly bill.
If you already have a phone number, you can contact us and we can discuss the cost to bring your own number to SeaChat or set up forwarding to your existing number.
Step 3: Connect Google Calendar
Integrate your Google Calendar with SeaChat to ensure that voice agent has the latest information about your availability. This will allow the voice agent to check availability and schedule appointments directly into your calendar.
To learn how to connect your Google Calendar with SeaChat, please refer to our Connect Google Calendar guide.
Step 4: Copy the Google Form Template
Copy our template Google Form that includes all the essential fields to gather information from your customers as well as the required Google Apps Script to automate the call and booking process. Ensure that you have a field called “Phone Number” as this is essential for the voice agent to make calls.
Collecting customer information using a different form? Contact us to set up the same integration and start booking appointments immediately.
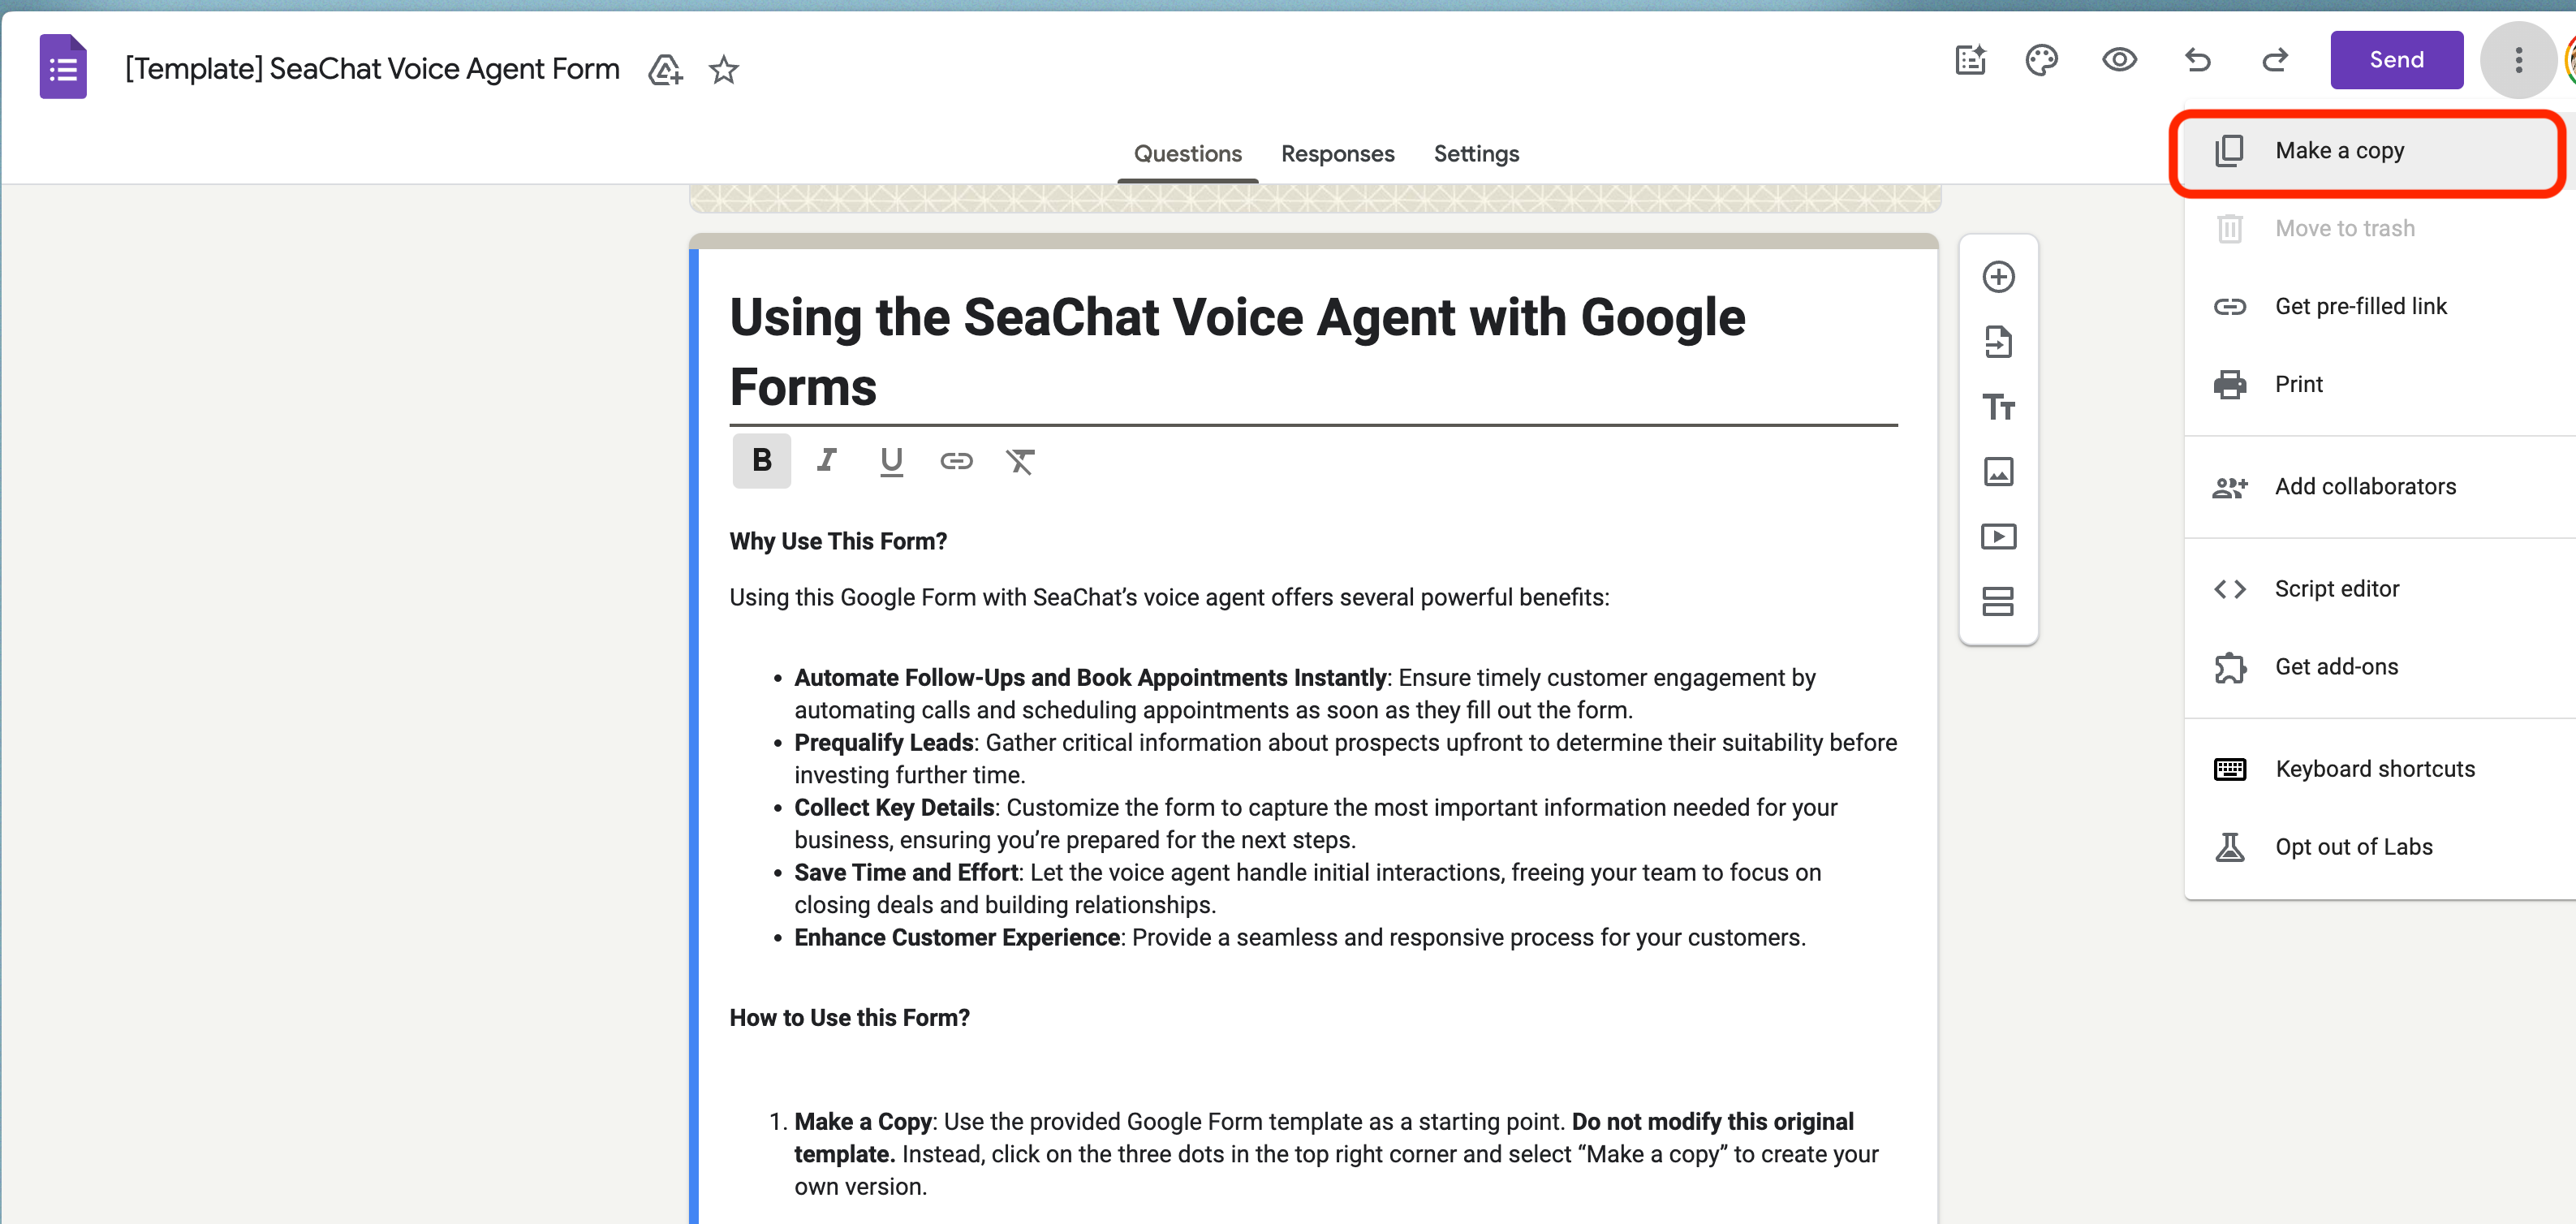
Copy the Google Form template
Step 5: Connect a Google Form to your Voice Agent
First, let’s find your SeaChat Agent ID and get a unique access token. These are the two keys you need to connect your Google Form to your SeaChat Voice Agent.
Find your SeaChat Agent ID
Sign in to your SeaChat account and click on the “Agent Information” tab. You can find the SeaChat Agent ID in the URL, e.g. https://chat.seasalt.ai/gpt/workspace/{WORKSPACE-ID}/bot/{AGENT-ID}/detail/botInfo (the string between bot/ and /detail is your Agent ID).
Get a unique access token
Go to the “API Key” section at the bottom of the “Agent Information” section. Click on “API Key” hyperlink. This will open the API key management page.
First, turn on the toggle of “Enable API Access”. Then, copy the Access Token. Note that the Access Token is a very long string and you need to copy it all.
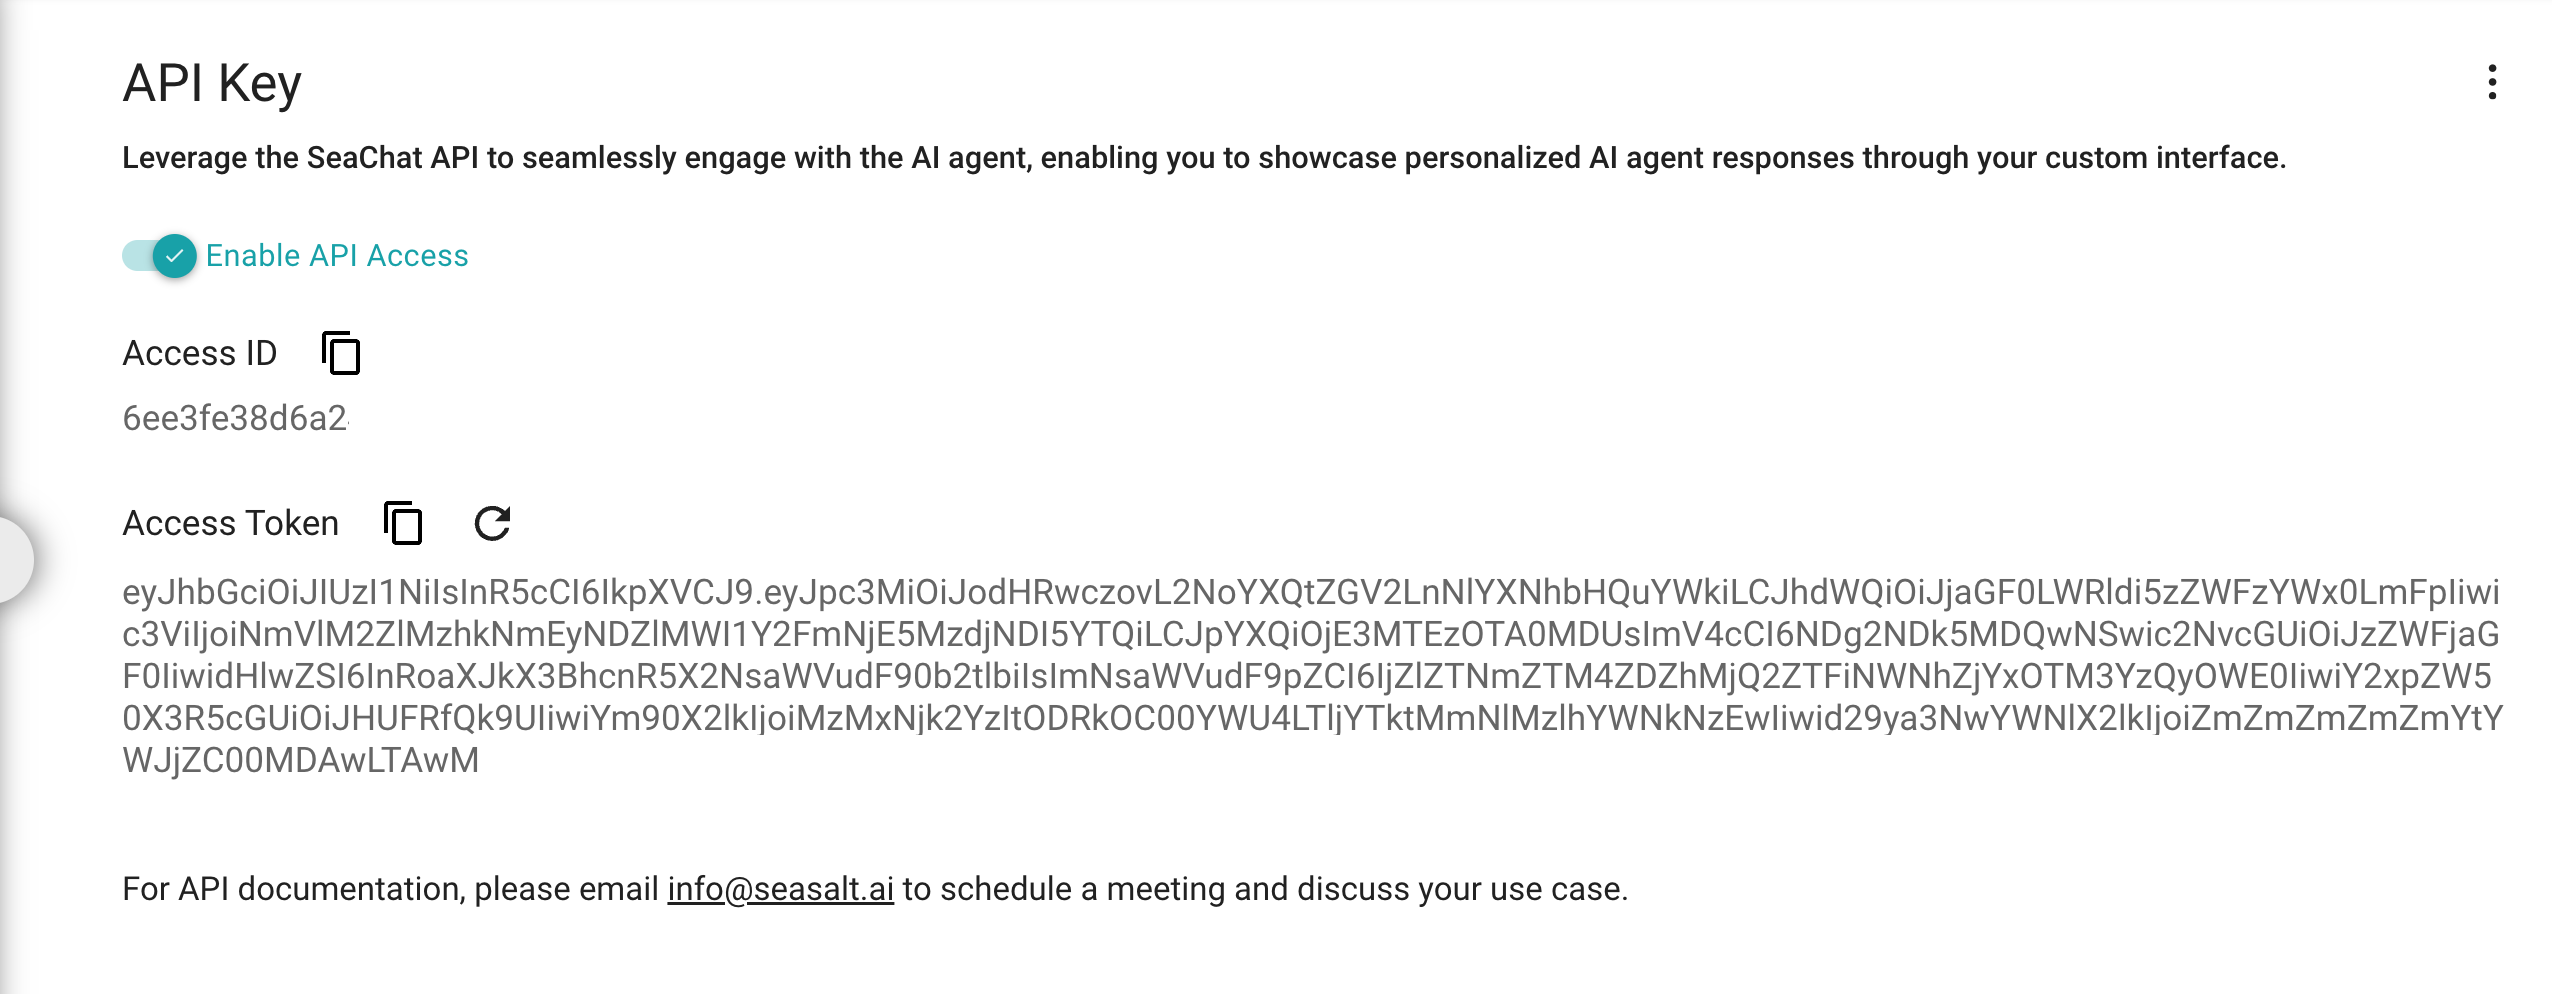
Generate a new access token
Add your Agent to your Google Form script
Open the Google Form you just copied and click on the three dots in the top right corner. Select “Script Editor”, which will open up a pre-filled script!
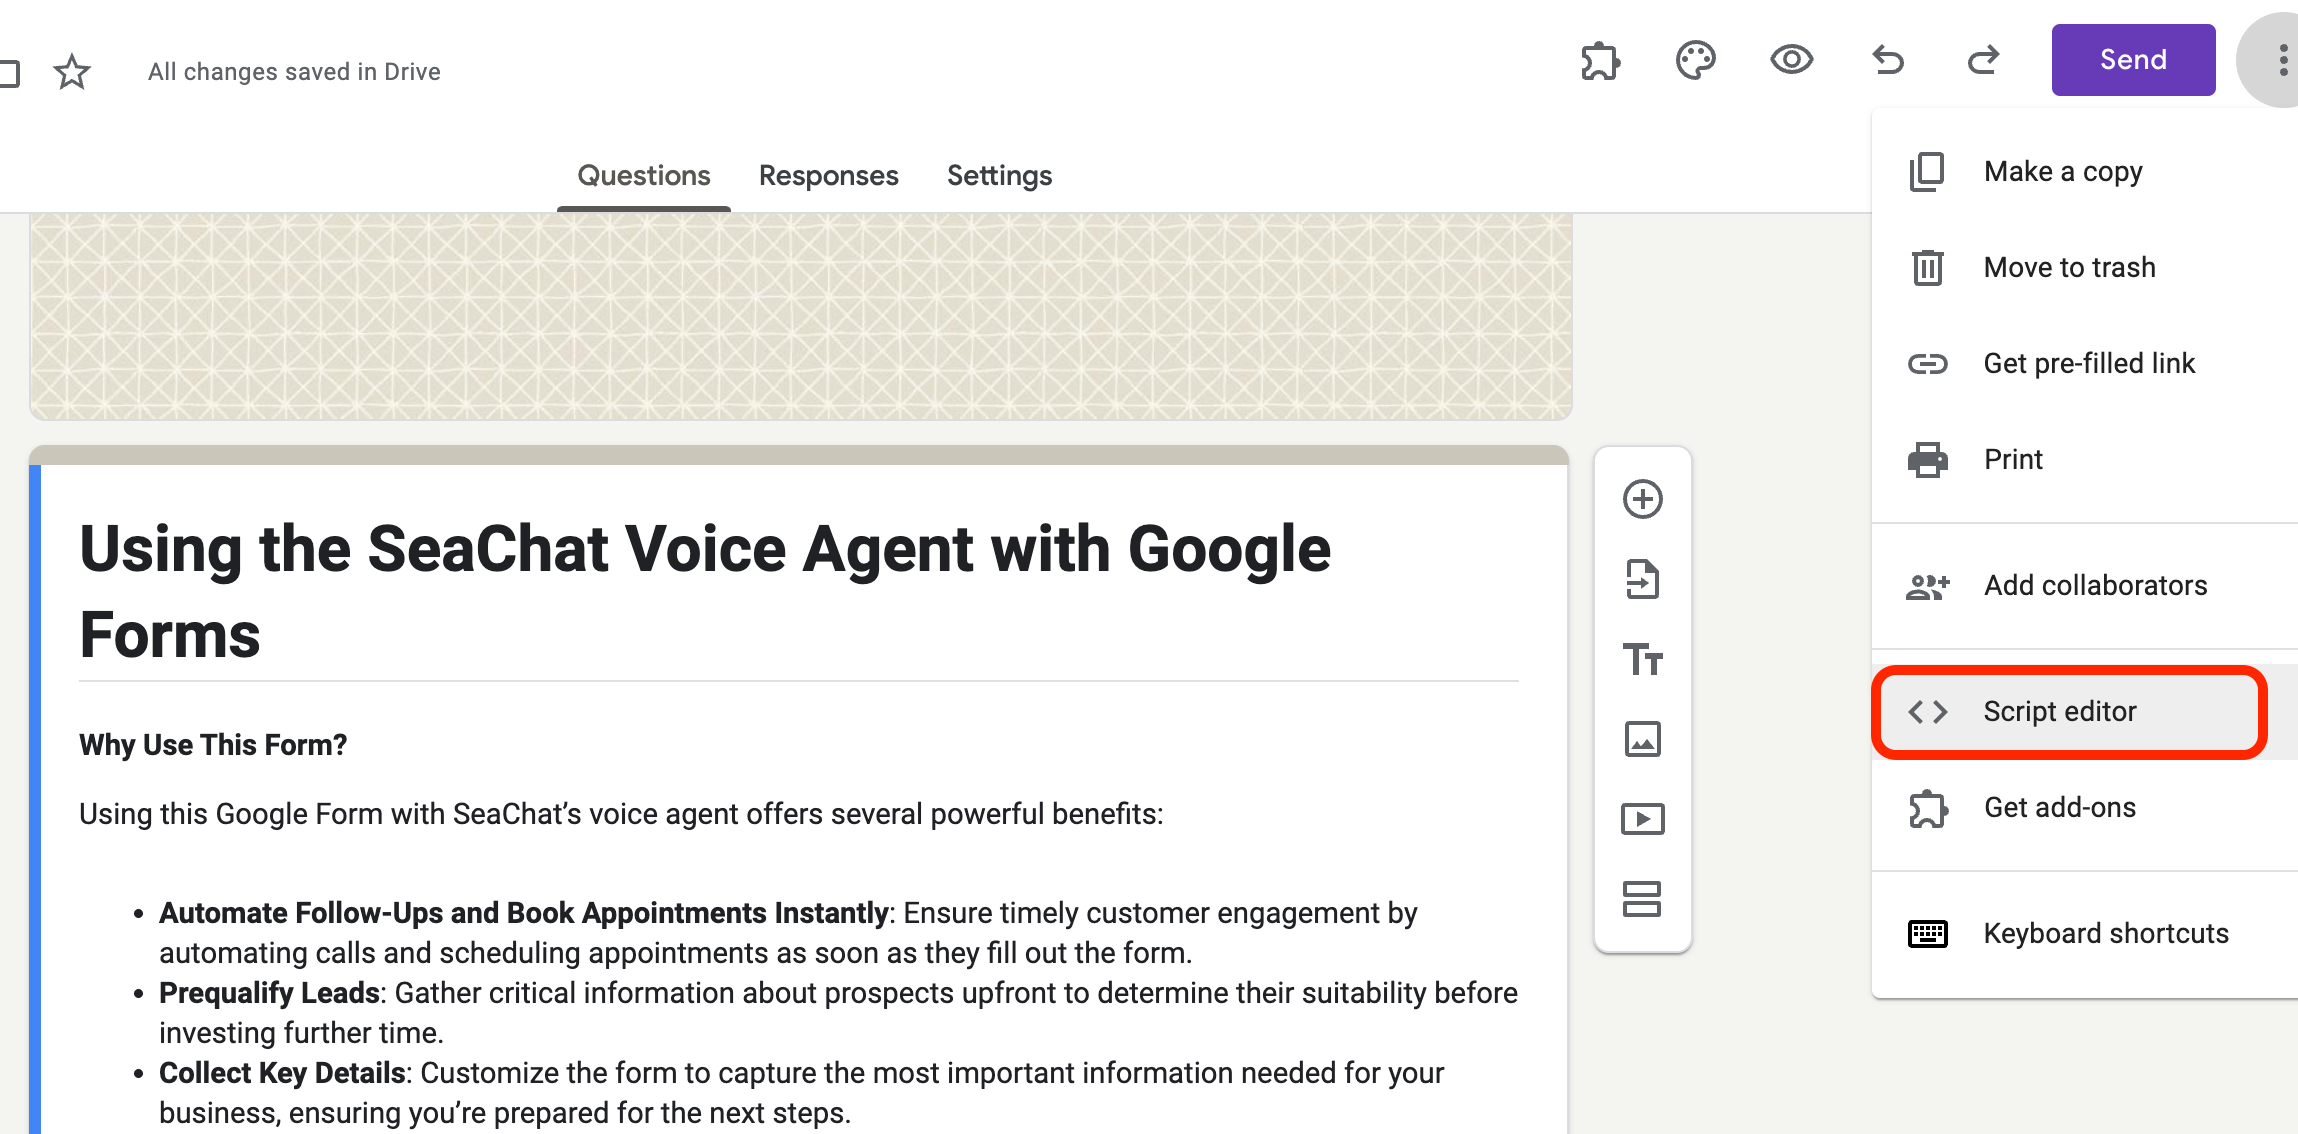
Open the script editor
Next, replace the YOUR_AGENT_ID and YOUR_ACCESS_TOKEN with the ones you just got. Note that you need to replace the entire string, including the curly braces {} around the values.

Where to find the agent ID and access token in Apps Script
For example, if your agent ID is 1234567890 and your access token is abcdefghijk, the script should look like this:

Replace the agent ID and access token
Finally, click on “Save” to save the changes. The save button is the flappy disk icon at the top menu.
Add a Trigger to the Google Form
Go to the “Triggers” section at the left-hand side menu. Click on “Add Trigger” button (in bottom right corner).
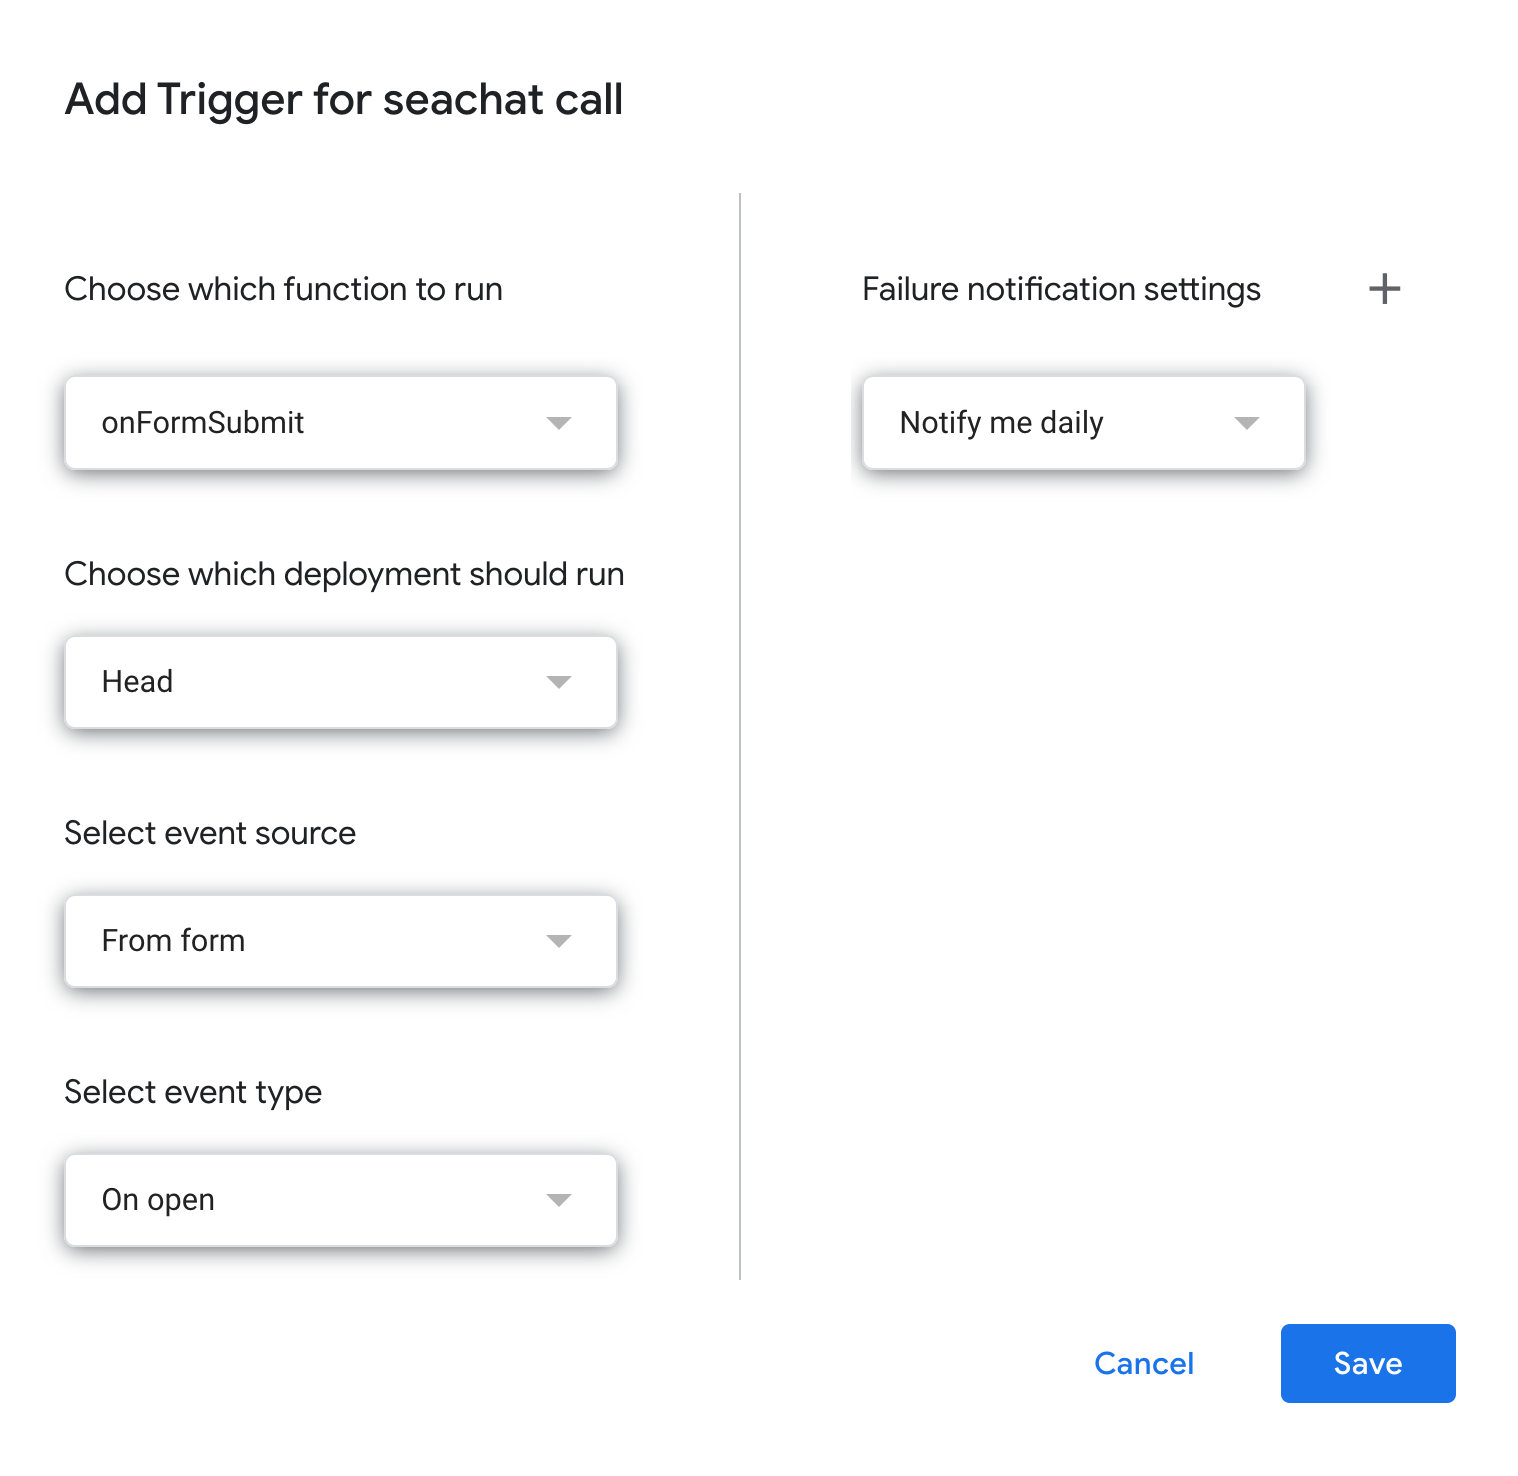
Add a trigger for the Google Form Apps Script
After clicking on “Save”, Google Forms will ask you to authorize the script to access your Google Form. Follow the steps to authorize the script. If you encounter any anthorization issues, please just go back to the script editor and click on “Save” again to restart authorization.
Step 6: Test the Phone Call by a Submission
Submit a test entry through your Google Form to ensure that the voice agent is working correctly. You should receive a call from the SeaChat agent shortly after submitting the form.
The SeaChat agent should call the number provided, prequalify the lead, and book an appointment if applicable. You are welcome to test a lot and improve the agent performance. There are plenty of resources on this wiki website to help you improve the agent performance.
Note: If you are not receiving a call, please check the Troubleshooting section below.
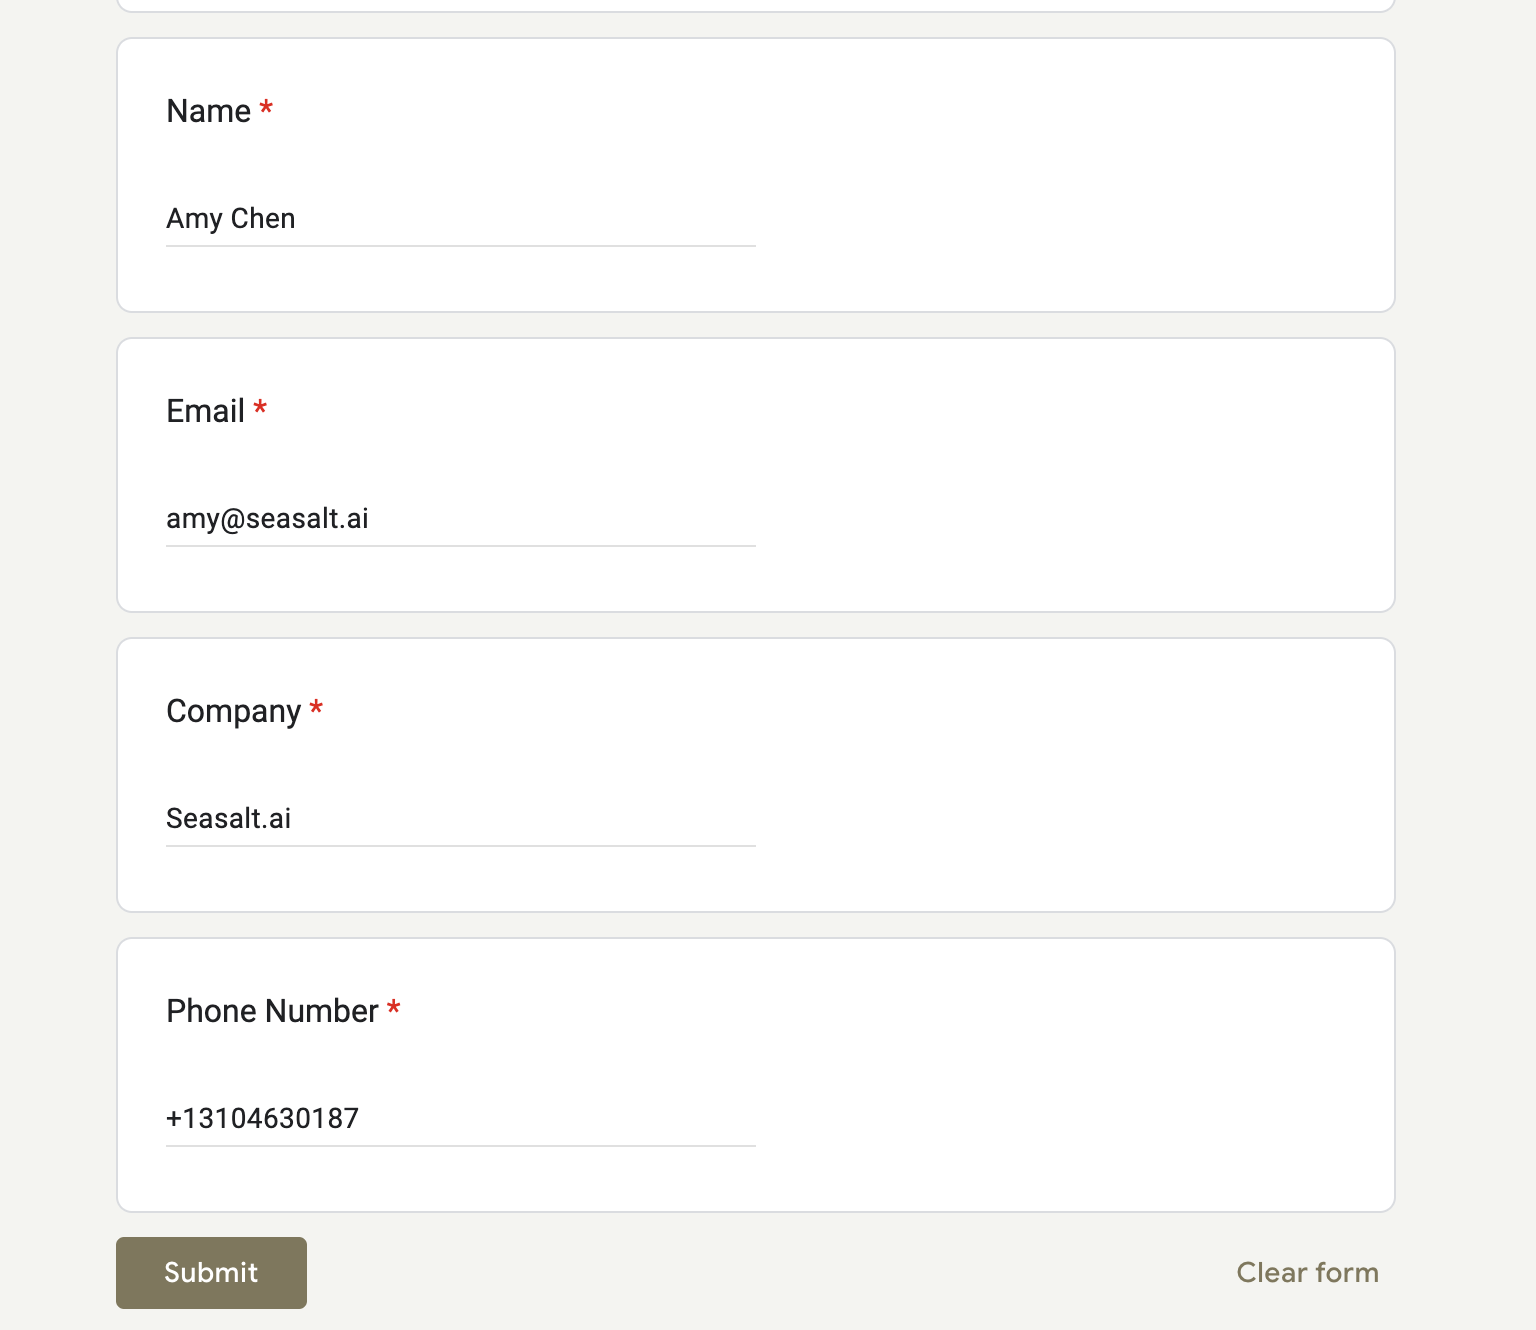
Test the voice agent via a Google Form submission
Troubleshooting
If the voice agent is not working, please check the following:
- The phone number you provided is correct and reachable (We support e.164 format, e.g. +1234567890)
- You have an active SeaChat account, an active phone number connected to your account, and an active Premium plan
- The SeaChat agent is connected to the Google Form (Double check Step 5. Ensure you replaced the agent ID and access token correctly)
If you have any questions, please contact us at seachat@seasalt.ai.
Step 7: (Optional) Document All Call Activities on a Google Sheet
Congratulations! You have now set up a Google Form that automatically calls your customers and books appointments into your calendar, as soon as the customer submits the form. This is a great start, but you might want to keep track of all calls made by the voice agent. To do this, you can create a new tab in your Google Sheet called “Call Logs”.
To do this, you can connect your Google Form to a Google Sheet, and then add an Apps Script to your Google Sheet to automate the logging of calls.
Connect Google Form to Google Sheet
First, you need to connect your Google Form to a Google Sheet. To do this, you can click “Responses” tab on your Google Form (You can find it at the top of the form management page), select “Link to Sheets” to create a new sheet. All the responses from your Google Form will be automatically logged into this new sheet.
Please open the Google Sheet after creating.
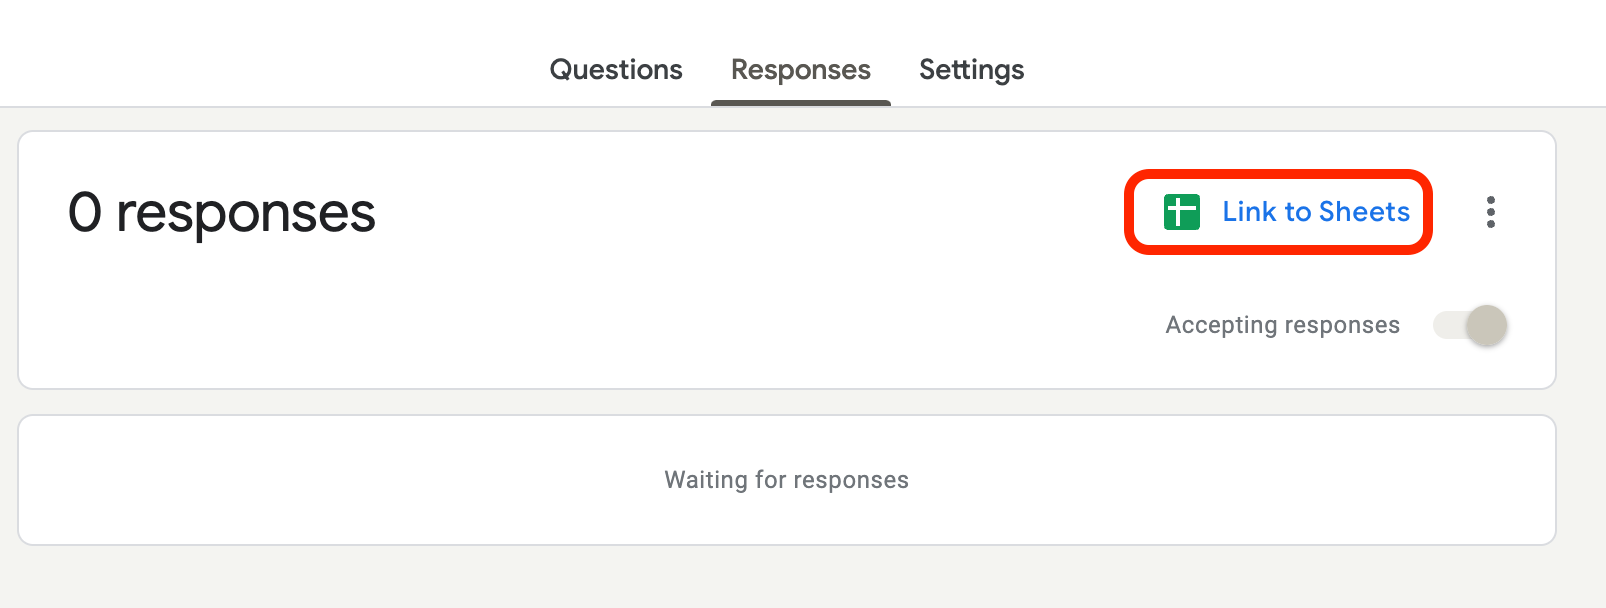
Connect your Google Form to a Google Sheet
Add and Deploy an Apps Script
Add an Apps Script to your Google Sheet to automate the logging of calls. Go to “Extensions” -> “Apps Script” on the top menu.

Create an Apps Script on a Google Sheet
Copy the following script and paste it into the Apps Script editor. Remember to replace {YOUR_SHEET_ID} with the ID of your Google Sheet.
How to find the sheet ID? You can your Google Sheet ID from the URL of your Google Sheet, e.g.
https://docs.google.com/spreadsheets/d/{SHEET_ID}/edit. For example, if your Google Sheet URL ishttps://docs.google.com/spreadsheets/d/abcdefg/edit, your sheet ID isabcdefg.
function jsonEscape(str)  {
    return str.replace(/\n/g, "\\\\n").replace(/\r/g, "\\\\r").replace(/\t/g, "\\\\t");
}

function doPost(e) {
  try {
    // Open the target Google Sheet by its ID
    const spreadsheet = SpreadsheetApp.openById("1clTaM5mSR5rsrNKL_5PrL3im5mTFYS_LSvqeVaFjDPQ");

    // Get or create the sheet named "test"
    let parsedData = JSON.parse(JSON.parse(jsonEscape(e.postData.contents)));
    let sheet = spreadsheet.getSheetByName("Call Logs");
    if (!sheet) {
      sheet = spreadsheet.insertSheet("Call Logs");
    }

    // Log the target sheet information
    console.log("Writing to Sheet: " + sheet.getName());

    // Append the relevant data to the sheet
    sheet.appendRow([
      new Date(), // Timestamp of the script execution
      parsedData["agent_number"], // From
      parsedData["customer_number"], // To
      parsedData["call_status"], // Call status
      parsedData["summary"], // Call summary
      JSON.stringify(parsedData["labels"]) // Labels
    ]);
    console.log("Data written successfully!");

    // Return success response
    return ContentService.createTextOutput("Data processed successfully!");
  } catch (error) {
    // Log any errors encountered during execution
    console.log("Error: " + error.message);
    console.log("Stack Trace: " + error.stack);

    // Return error response
    return ContentService.createTextOutput("Error processing data: " + error.message).setMimeType(ContentService.MimeType.TEXT);
  }
}
After pasting the script, check whether Line 16 has the correct sheet ID. Then,click on “Save” to save the changes.
Deploy the Apps Script
Click on “Deploy” button on the top menu.

Deploy the Apps Script
Select “New Deployment” and then choose “Web app” as the deployment type.
Please copy the setting in the screenshot. After you have copied the settings, click on “Deploy” button.
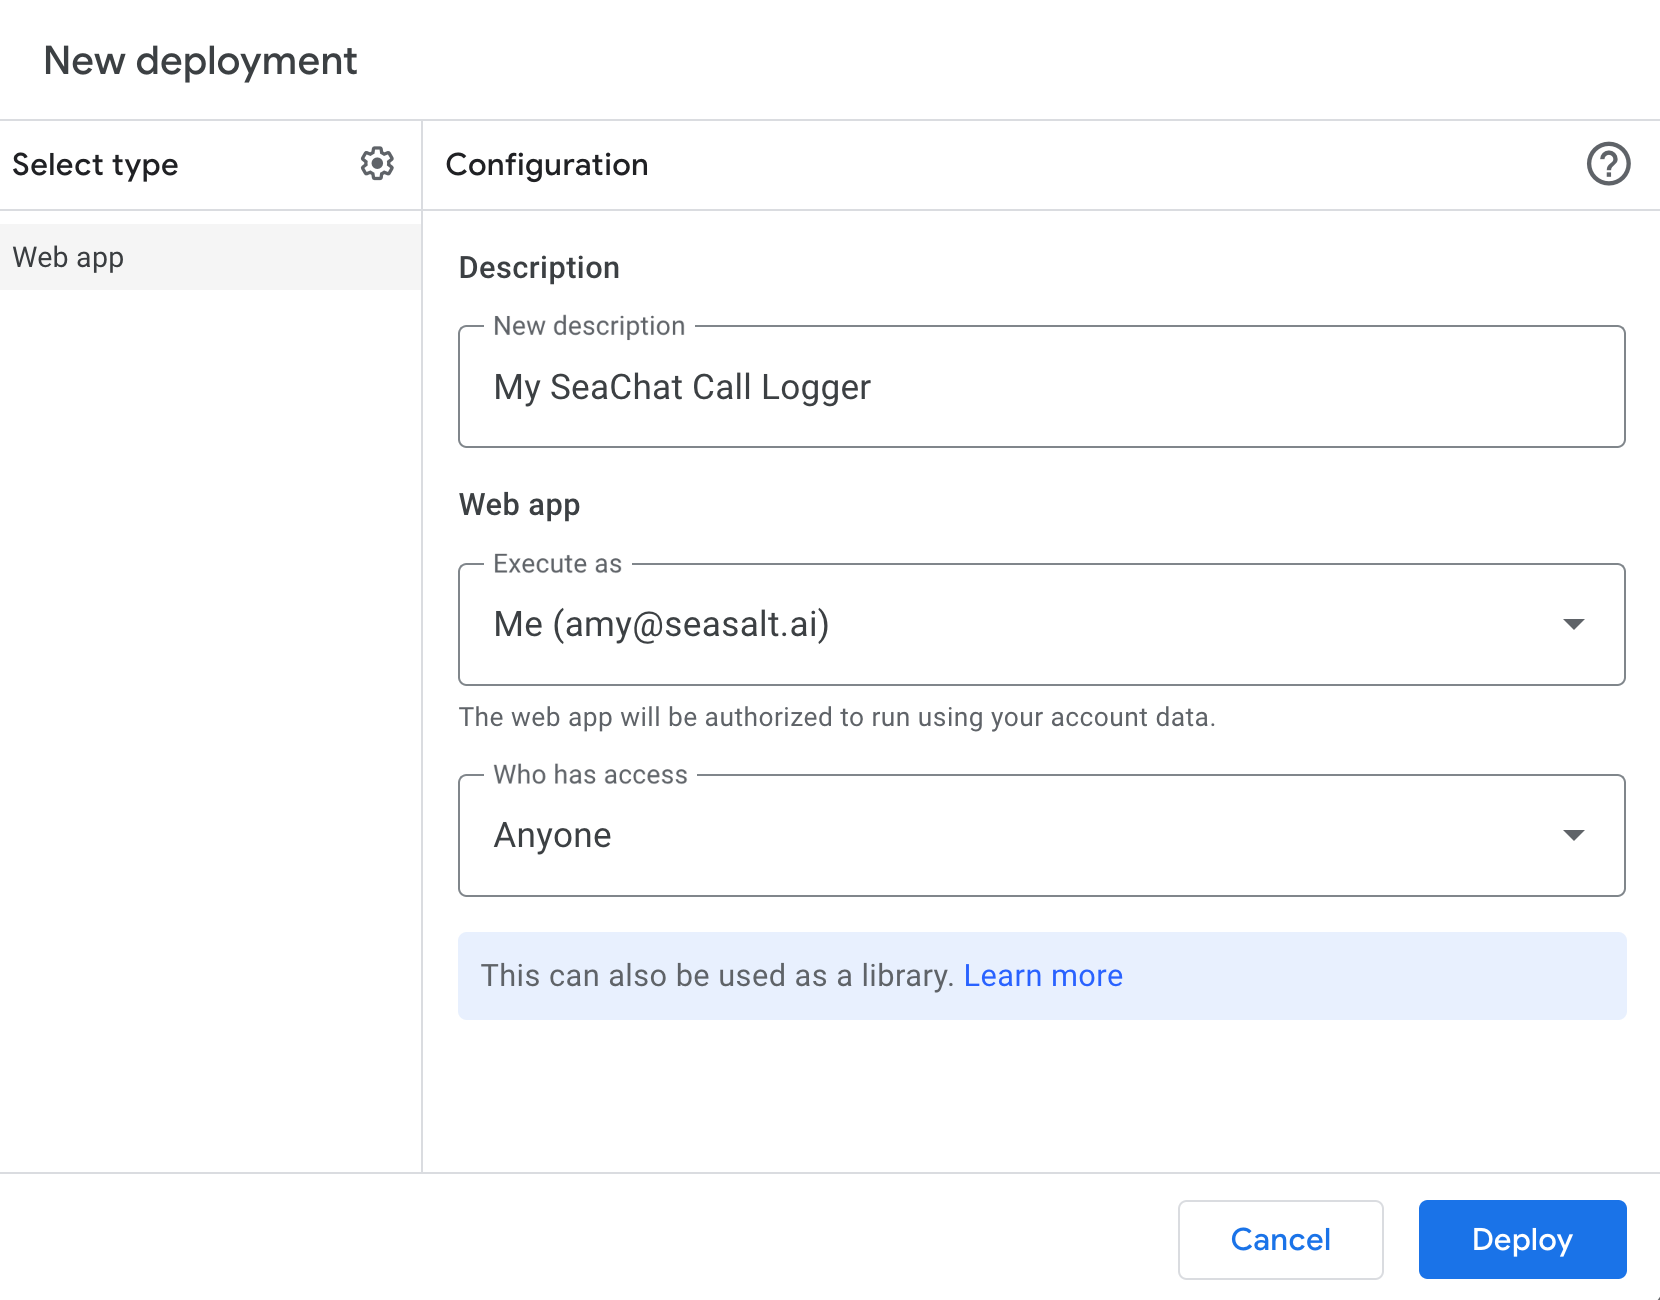
Configure the web app
You will need to authorize the web app to access your account. Click on “Authorize” button and then select your Google account.
Copy the Web App URL back to the Google Form Script
Note: In this final step, you need go back to the Google Form script and replace the
{YOUR_CALLBACK_URL}with the web app URL you just copied. The script in Step 5 is the Google Form script.
Copy the web app URL. You will need this URL to start receiving data from SeaChat Voice Agent and log it into your Google Sheet. This is the URL you will need to replace the {YOUR_CALLBACK_URL} in the Google Form script.
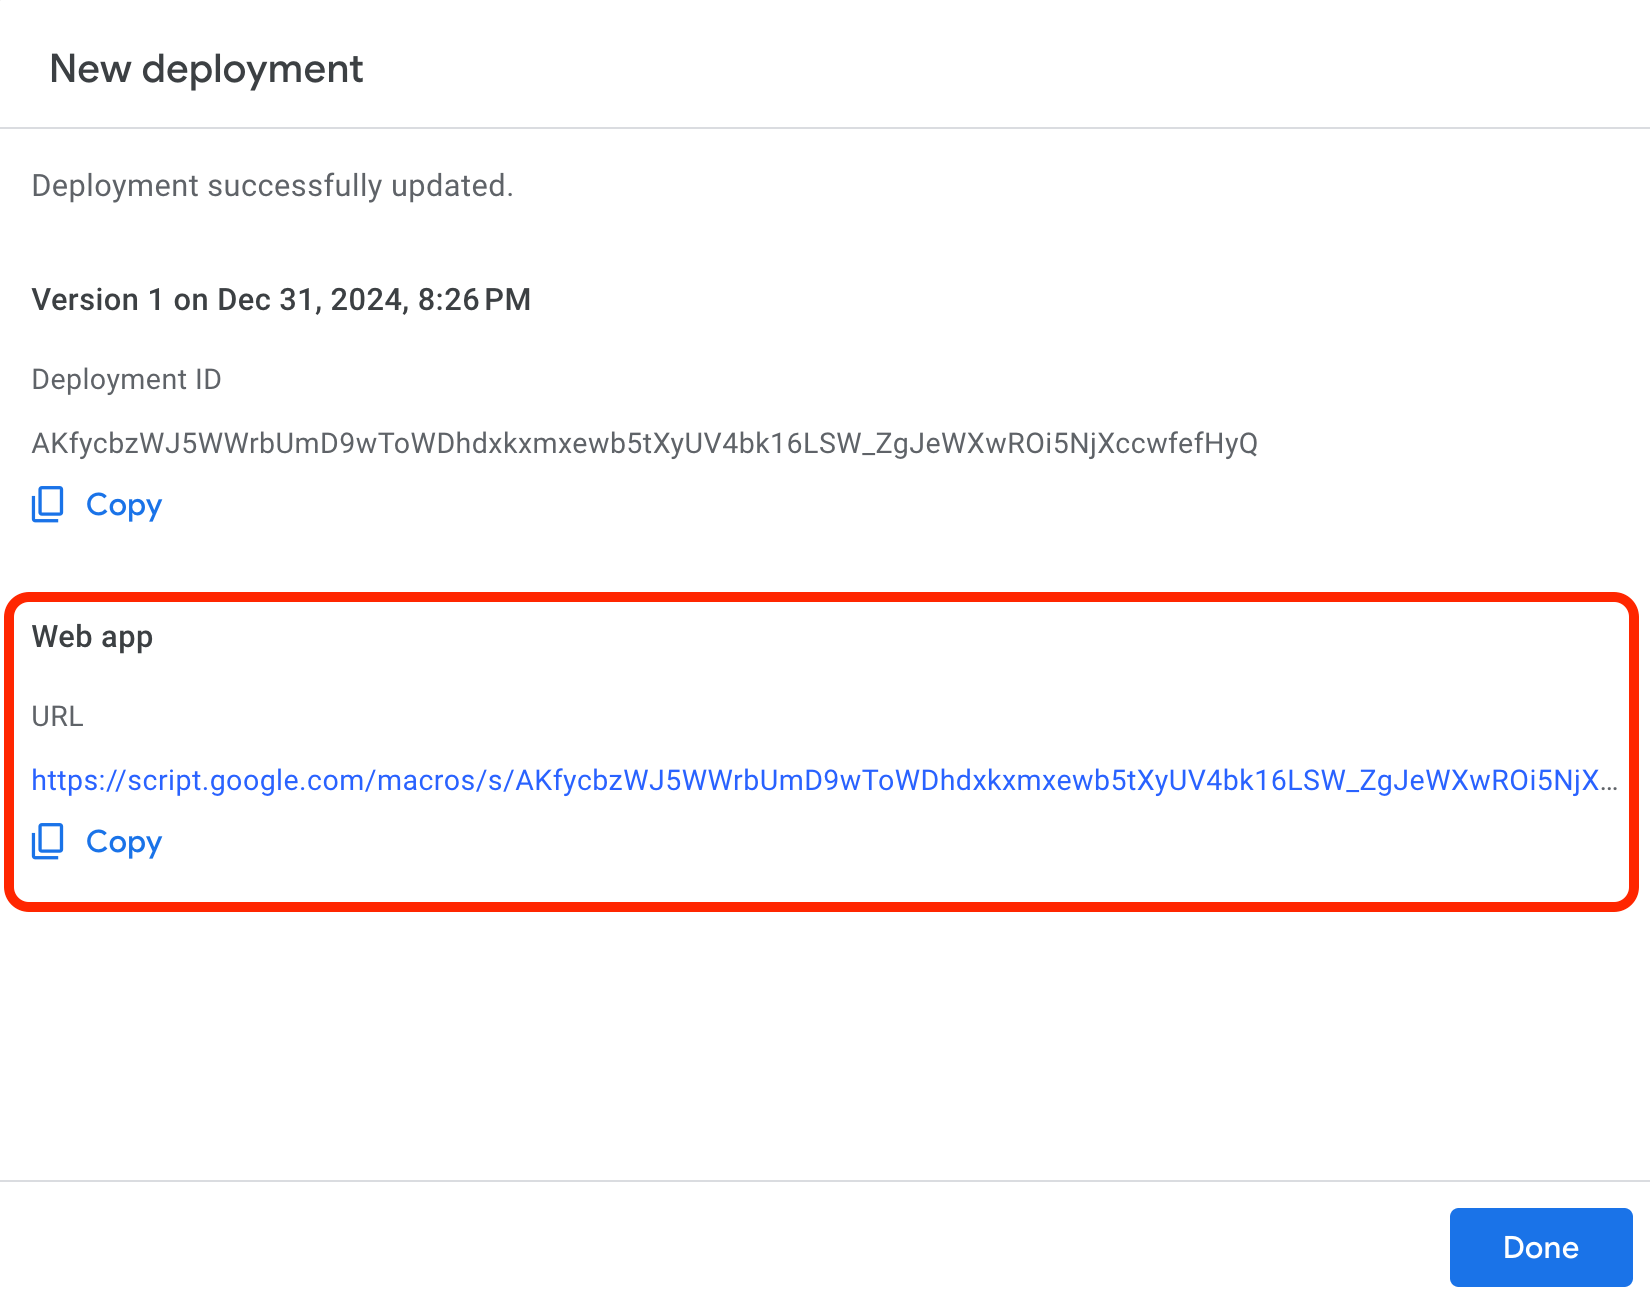
Copy the web app URL
Finally, replace the entire payload section with the following code snippet and then click on “Save” to save the changes:
    payload: JSON.stringify({
      "to_number": responsesObj['Phone Number'],
      "callback_url": "{YOUR_CALLBACK_URL}"
    })
"callback_url": "{YOUR_CALLBACK_URL}" will look like something like this: "callback_url": "https://script.google.com/macros/s/abcdefggregqfkelwfww/exec"
Step 8: (Optional) Check the Call Logs
Make a call again and check the “Call Logs” tab in your Google Sheet after the call is finished. You should see the call logs there. By default, each new row in the “Call Logs” tab is a new call log containing the following information:
- Timestamp of the call
- Caller number, or AI agent phone number
- Customer number, or the phone number the customer submitted in the Google Form
- Call status, e.g. “Completed”, “Voicemail”, “No Answer”, etc.
- Call summary
- Labels generated from the conversation
Congratulations
Congratulations! You have now set up a Google Form that automatically calls your customers and books appointments into your calendar, as soon as the customer submits the form. For high achievers, you have also set up a Google Sheet to log all call activities.
You can now book 10x more appointments, serve customers 24/7 without needing to work more or hire more people.
If you need help with integrating SeaChat with other types of forms, please contact us at seachat@seasalt.ai.