Facebook Messenger
🎥 Video Tutorial
Overview
In this section, we will dive deeper into the process of setting up a ChatGPT-powered chatbot or chat agent on Facebook Messenger. By the end of this section, you will have a clear understanding of how to:
- Automate responses to user messages:
- Connect your Messenger business account to the SeaChat chatbot and agent platform.
- Train the chatbot using ChatGPT’s advanced language model to generate natural language responses to a wide range of user queries.
- Configure the chat agent to automatically respond to incoming messages based on your knowledge base.
- Access all conversations with users through SeaChat:
- Use SeaChat, a user-friendly interface, to access and monitor all conversations between users and your chatbot.
- Review chat transcripts, analyze user behavior, and identify areas for improvement in the chat agent’s responses.
- Manage and organize conversations efficiently to ensure seamless communication with users.
- Enable users to request live agent assistance:
- Implement a special command that allows users to request assistance from a real human agent if they have complex queries or require personalized support.
- Seamlessly transfer conversations from the AI chat agent to live human agents, ensuring a smooth and efficient transition.
- Empower users to choose the level of support they need, enhancing the overall customer experience.
By the end of this tutorial, you’ll have a SeaChat agent powered Facebook Messenger bot and also a SeaChat console to view all messages, as shown below:
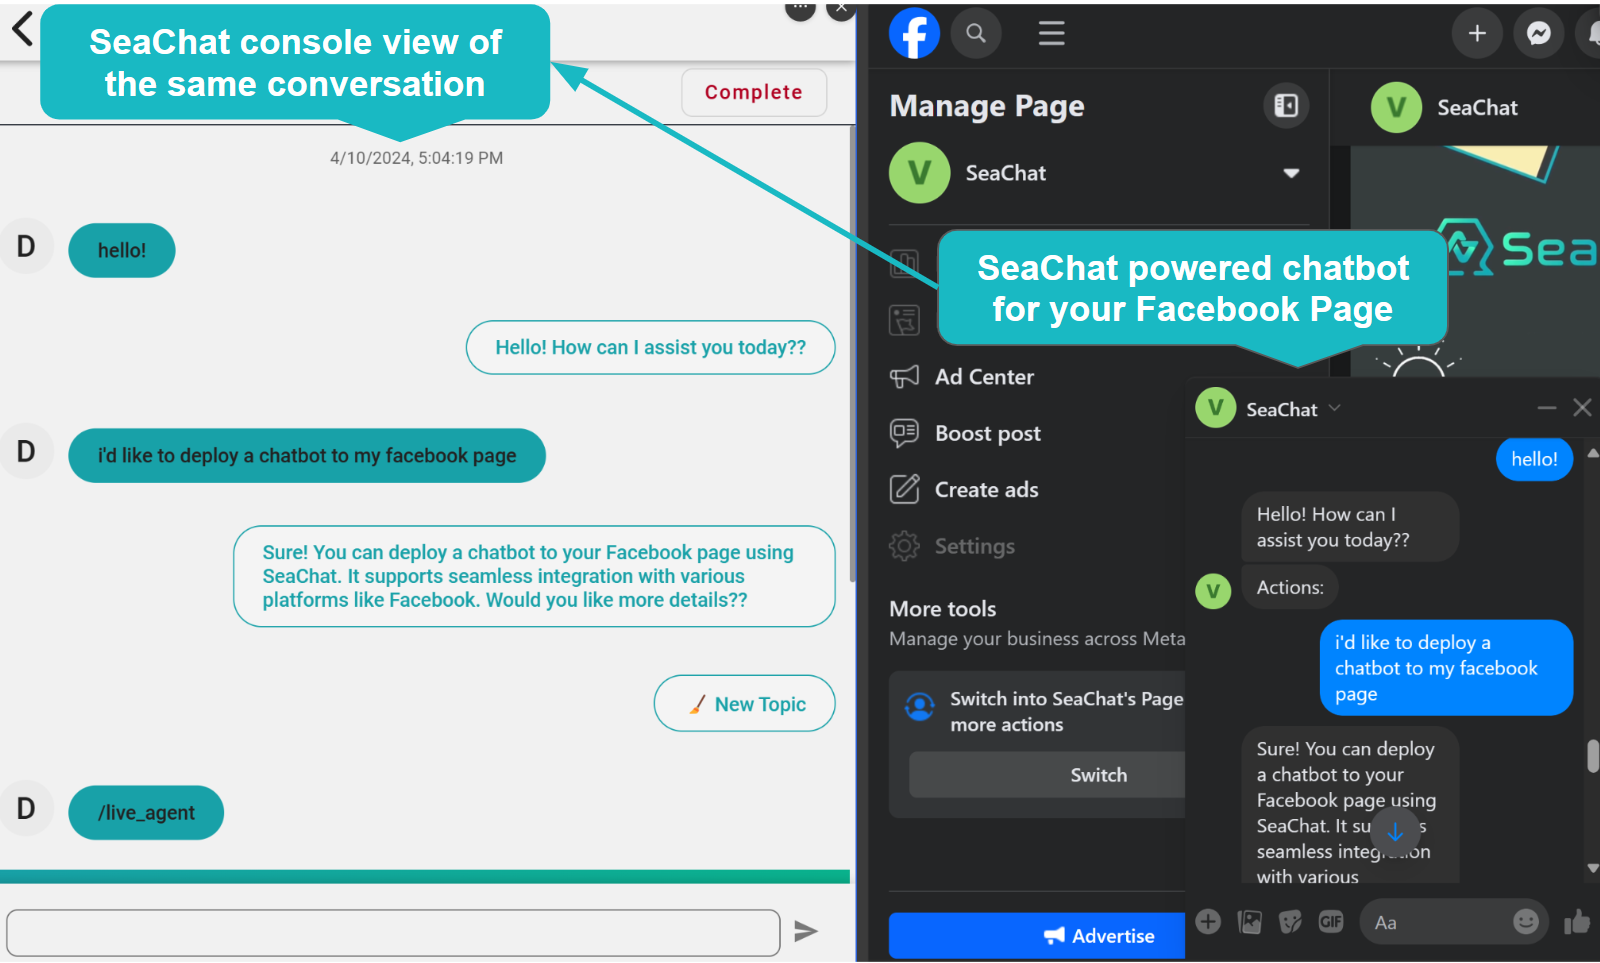
ChatGPT-powered chatbot integration with Facebook Messenger using SeaChat
Before embarking on the setup process, it’s essential to keep in mind a few key points:
Messenger limitations:
- The SeaChat AI agent is designed to respond to incoming messages only and cannot initiate conversations on its own.
- However, you as the agent creator will still be able to talk with the users once a live human agent is requested.
Who benefits from this integration:
- Businesses and organizations with a high volume of incoming Messenger messages that require automation.
- Companies looking to provide personalized and engaging customer support experiences.
- Customer service departments seeking to reduce the burden on human agents by automating routine inquiries.
Facebook Messenger Setup
Setting up Facebook Messenger can be a straightforward process with the right guidance. Here’s a short version of the steps involved. You can also click on the titles to see a more detailed explanation of each step:
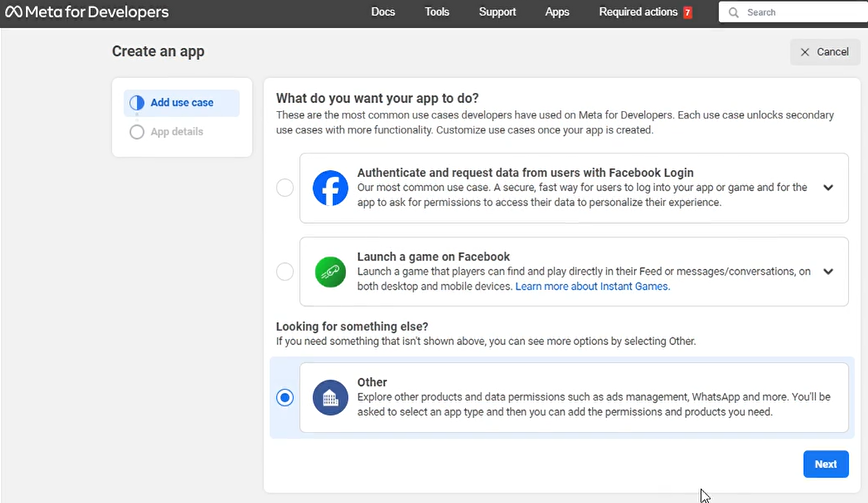
- Go to the Meta Developer Site.
- Click on My Apps in the top-right corner.
- Select Create App from the dropdown menu.
- Choose Other under App Type.
- Enter a unique app name, avoiding the use of Messenger App or Facebook in the name.
- Scroll down to the bottom of the app list.
- Find Messenger and select it to add the product to your app.
- Carefully review the information on the configuration page.
- Follow the instructions to provide necessary details, such as business name, address, and contact information.
- Ensure that all required fields are filled out correctly.
- Once the configuration is complete, generate a permanent access token.
- This token is essential for using the Messenger API.
- Properly remove the page access from your Meta app
- Click the Remove button inside SeaChat
📚 Recommended Reading:
Remember to adhere to the Messenger API policies and guidelines to maintain compliance and avoid any potential issues.
The following is an elaborated explanation that walks you through the process step-by-step:
Create a Facebook Messenger App
You’ll first need to go to Meta Developer Site and create a new Facebook Messenger app by clicking My Apps in the top right corner, and then selecting Create App from the dropdown menu.

Create a New Messenger
Choose App Type
Create an Other app because we’ll just use this App for accessing your Messenger account. On the Select app type page, select Business for the type, then click Next.
Create an Other app
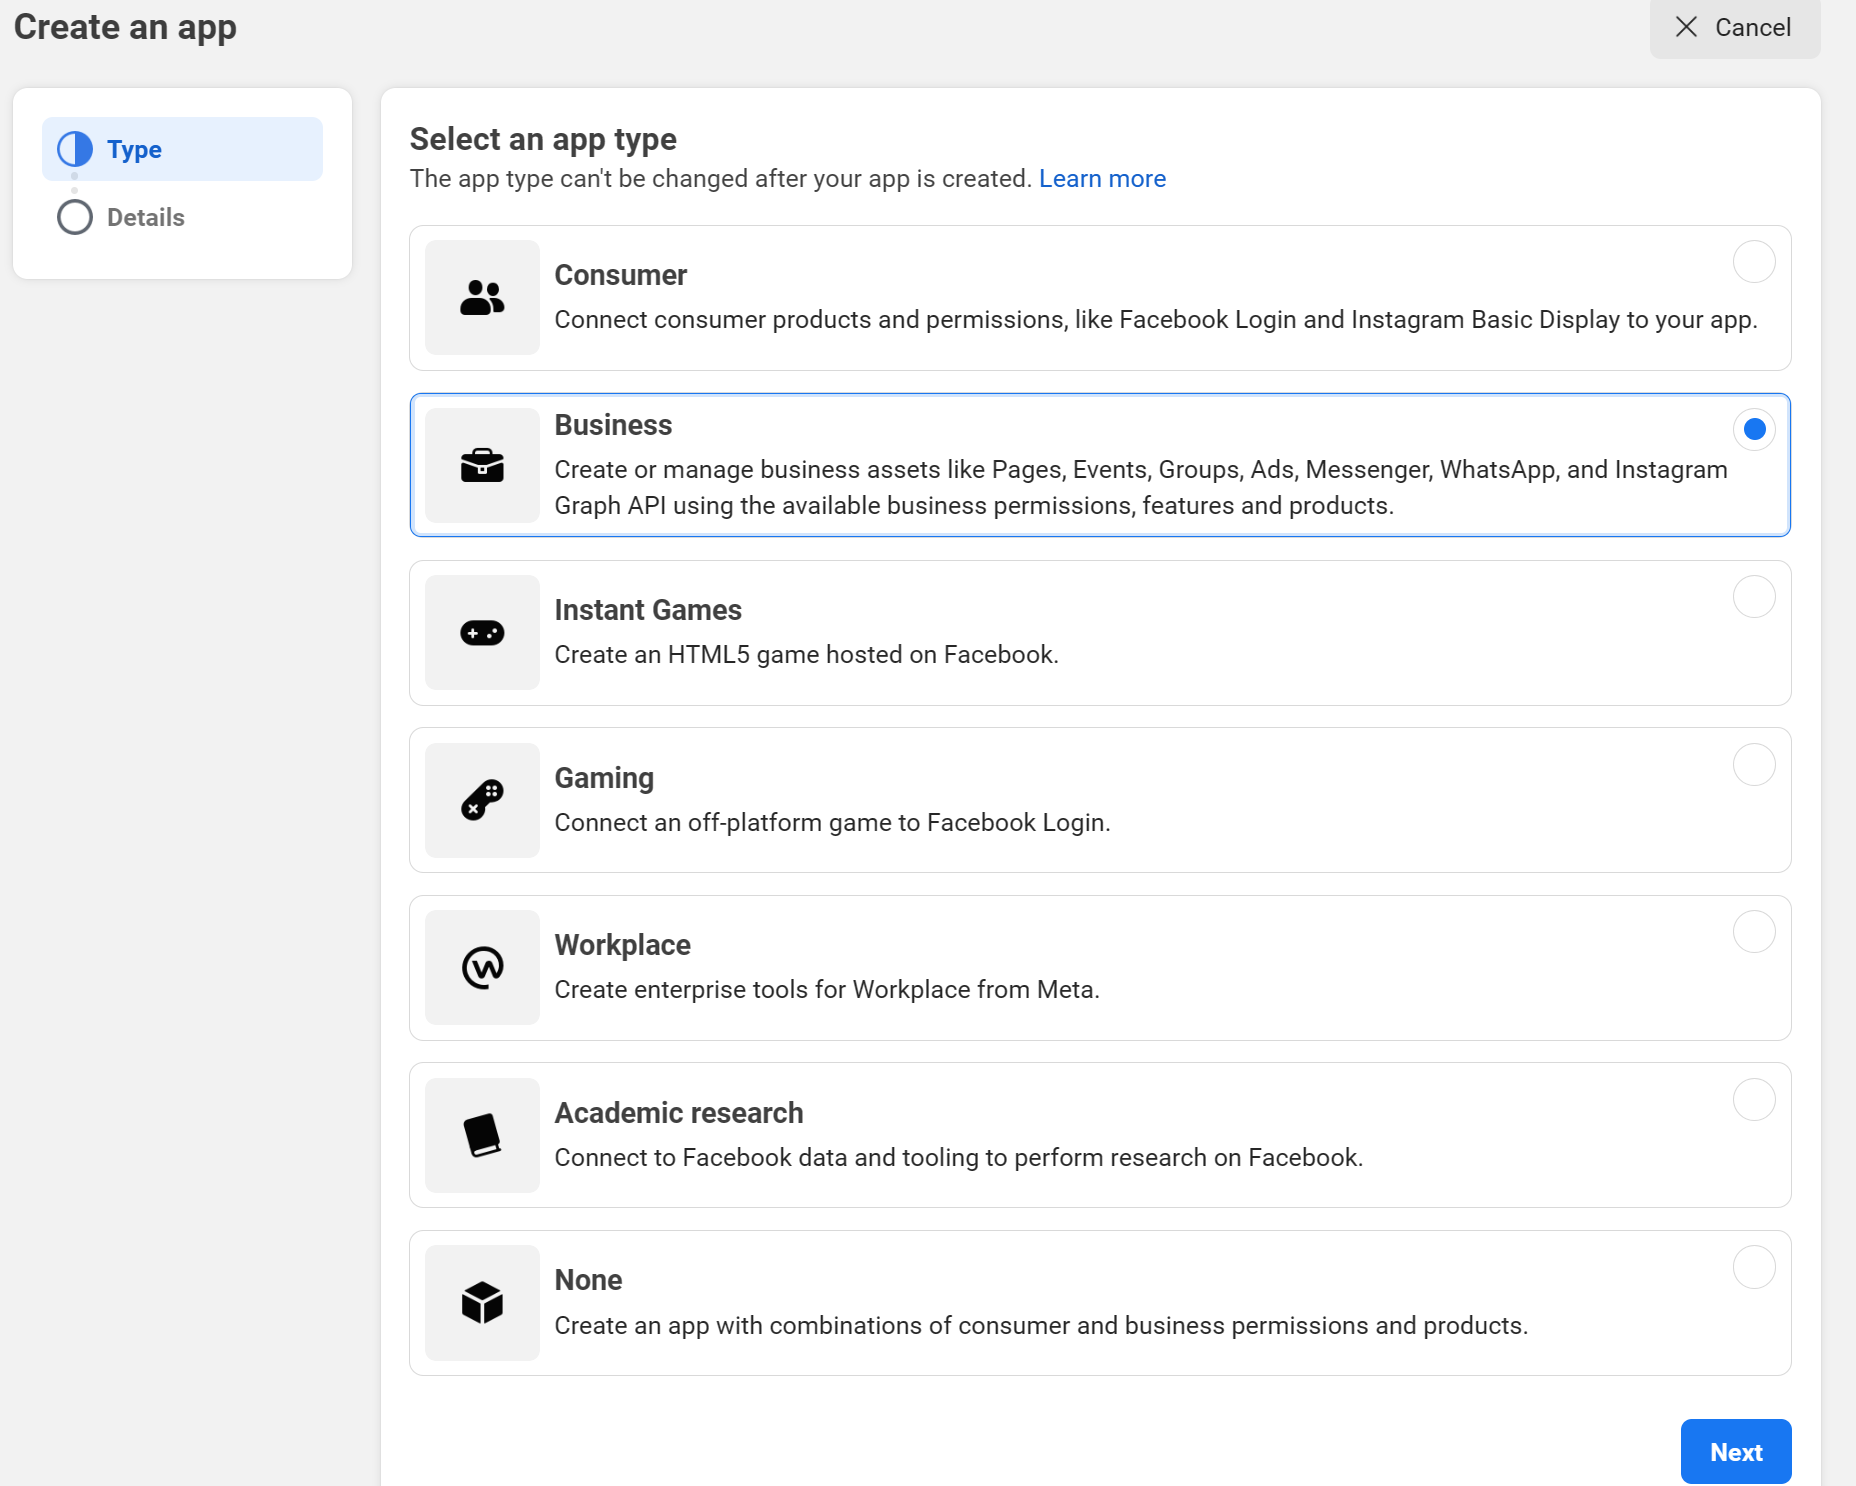
Choose Business
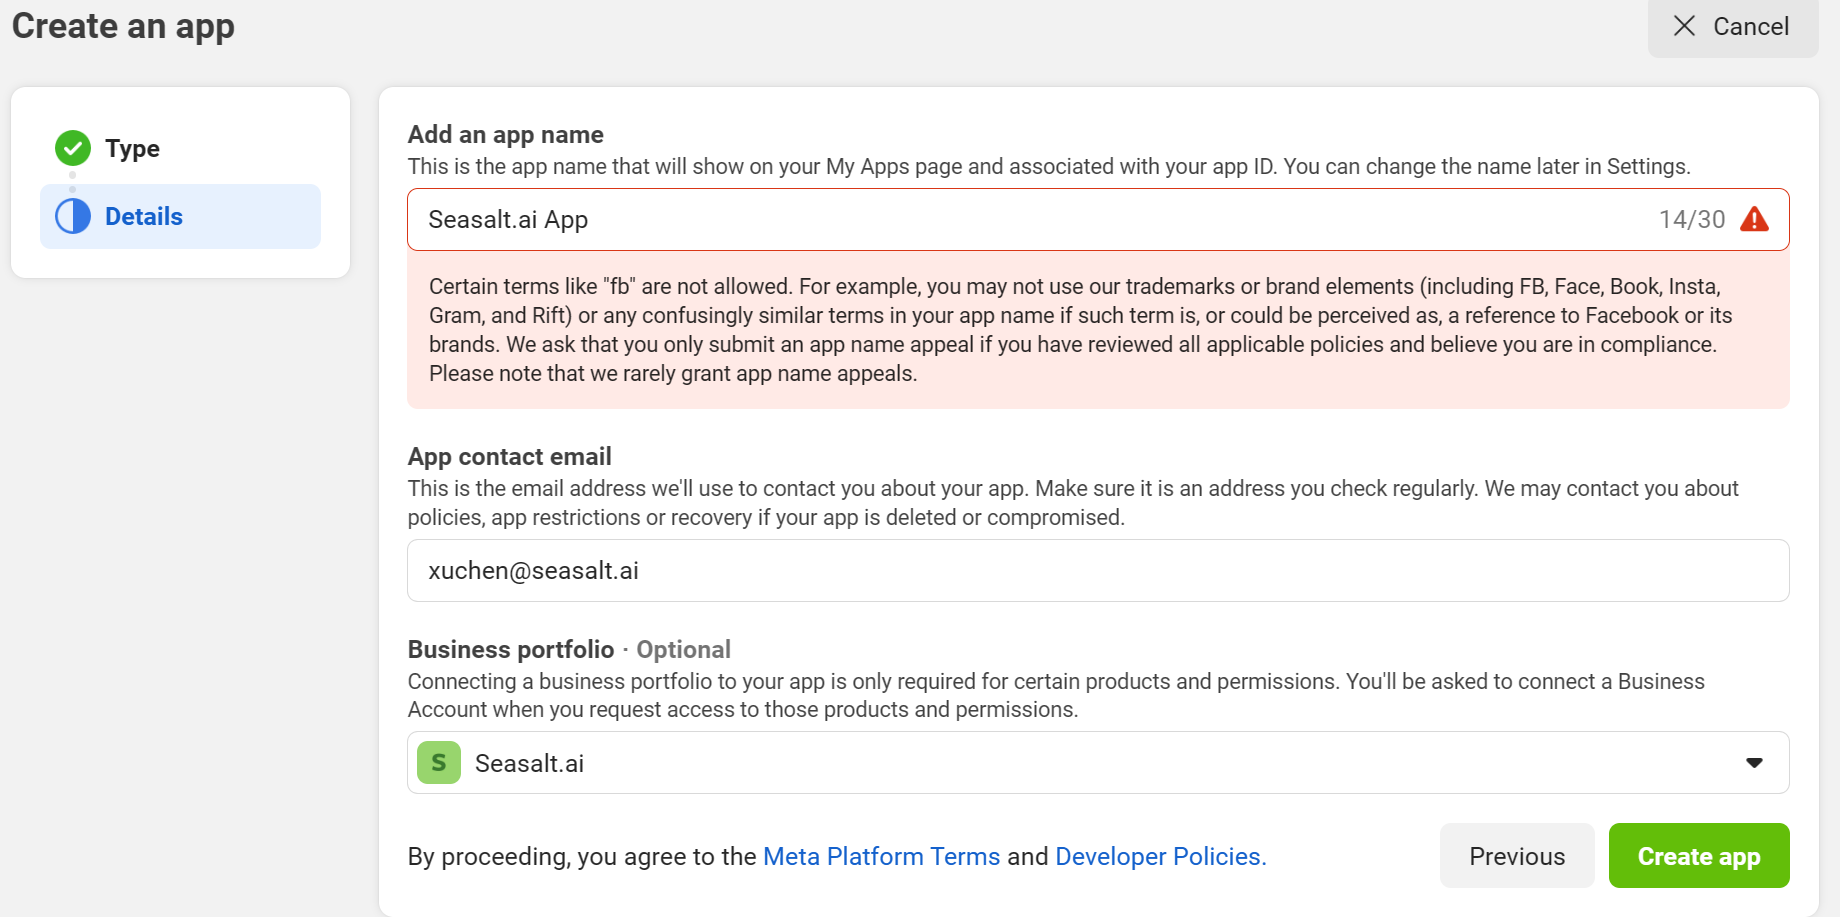
Here we created an app called Seasalt.ai App, note that Meta doesn’t allow the app to have Facebook or Messenger in the name. Carefully read through warning messages when choosing the app name.
Create App
Add Messenger Product
After creating the App, let’s add the Messenger product. Find the Messenger box under the Add products to your app section, and click Set up to create your app.
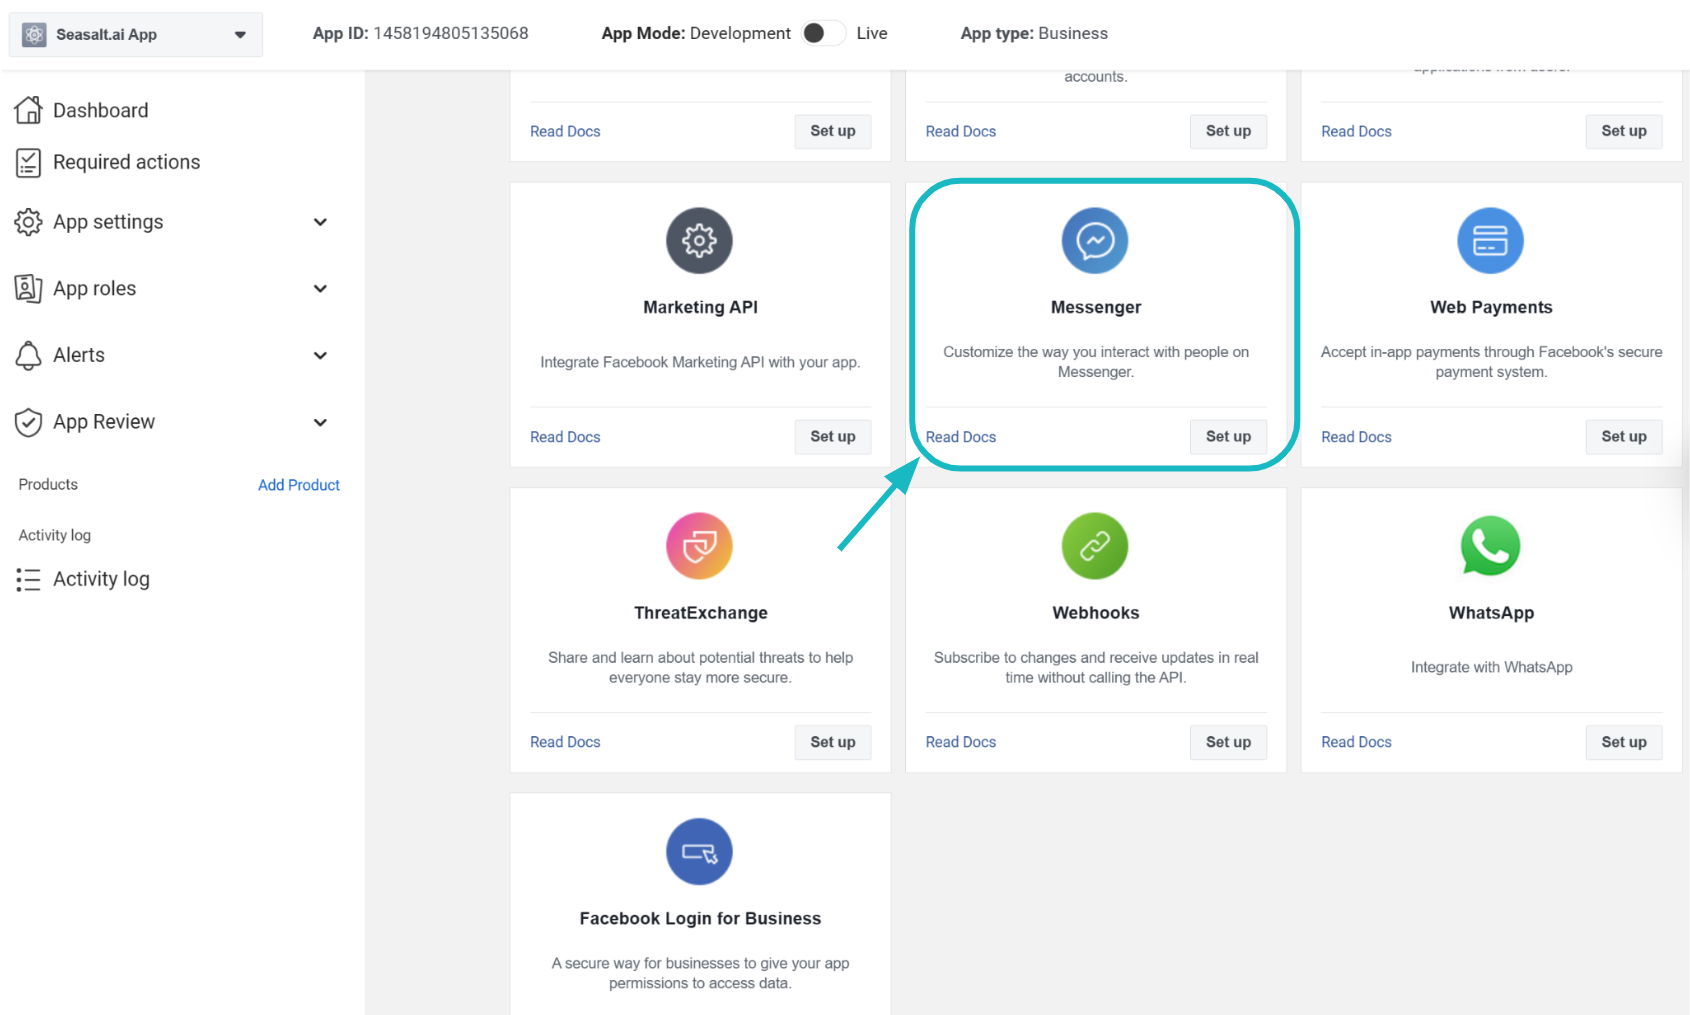
Add Messenger to Your App
How to Configure Messenger Application
🚨 Warning 🚨
Here is where things get a bit more complicated. If you are not careful enough and miss a step, you might not be able to successfully configure your Messenger application. So, let’s carefully go through the following instruction together.
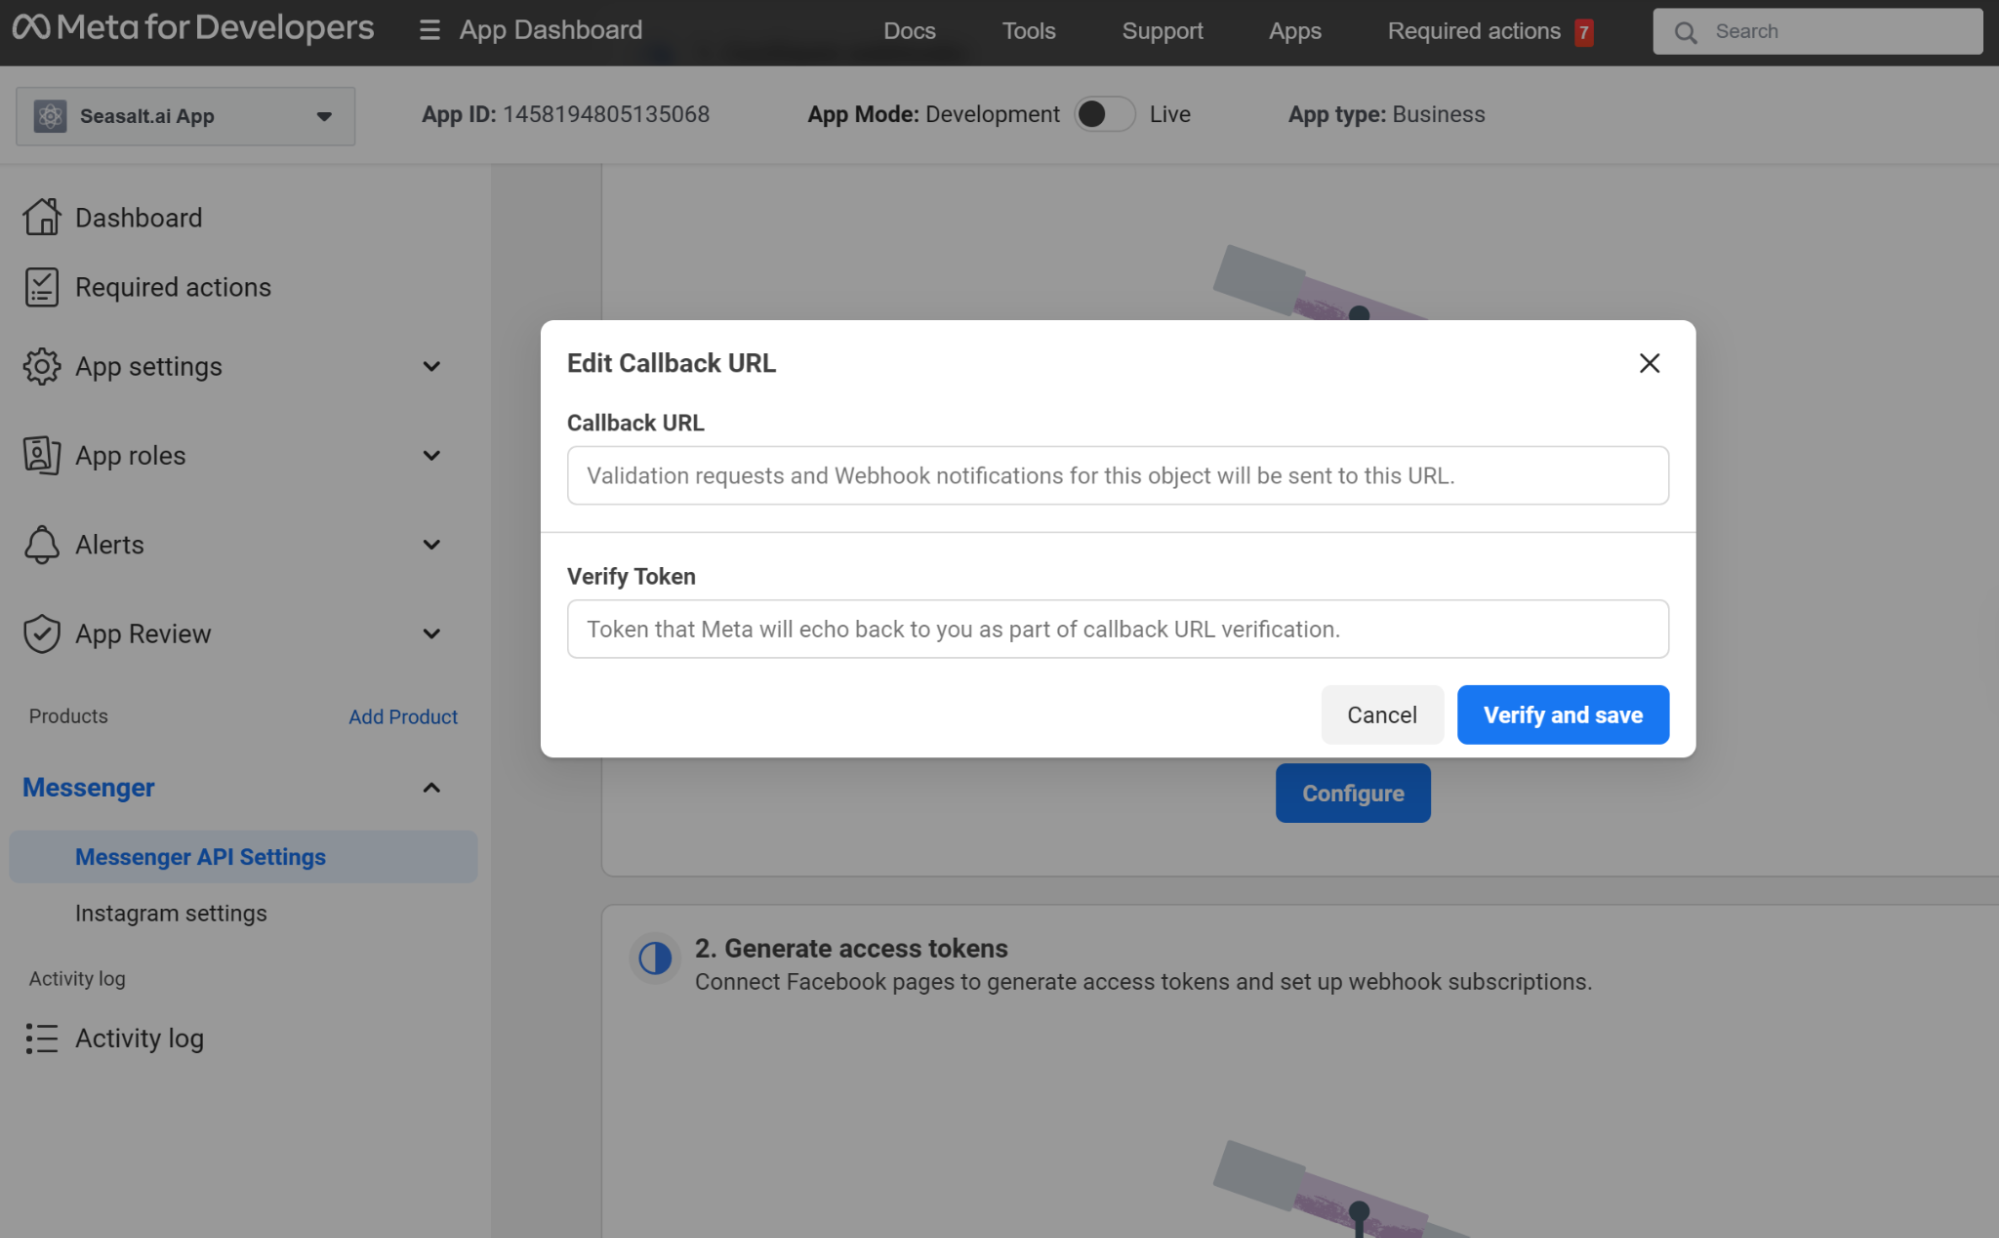
Step 1: Configure webhooks
Find Messenger API under Messenger on the left. From here we’ll first need to configure the Webhook and tokens provided by SeaChat.
Verify Token
Here is all you have to do. Go to SeaChat, navigate to Agent Configuration → Channels → Messenger to get the Callback URL and Verify token.
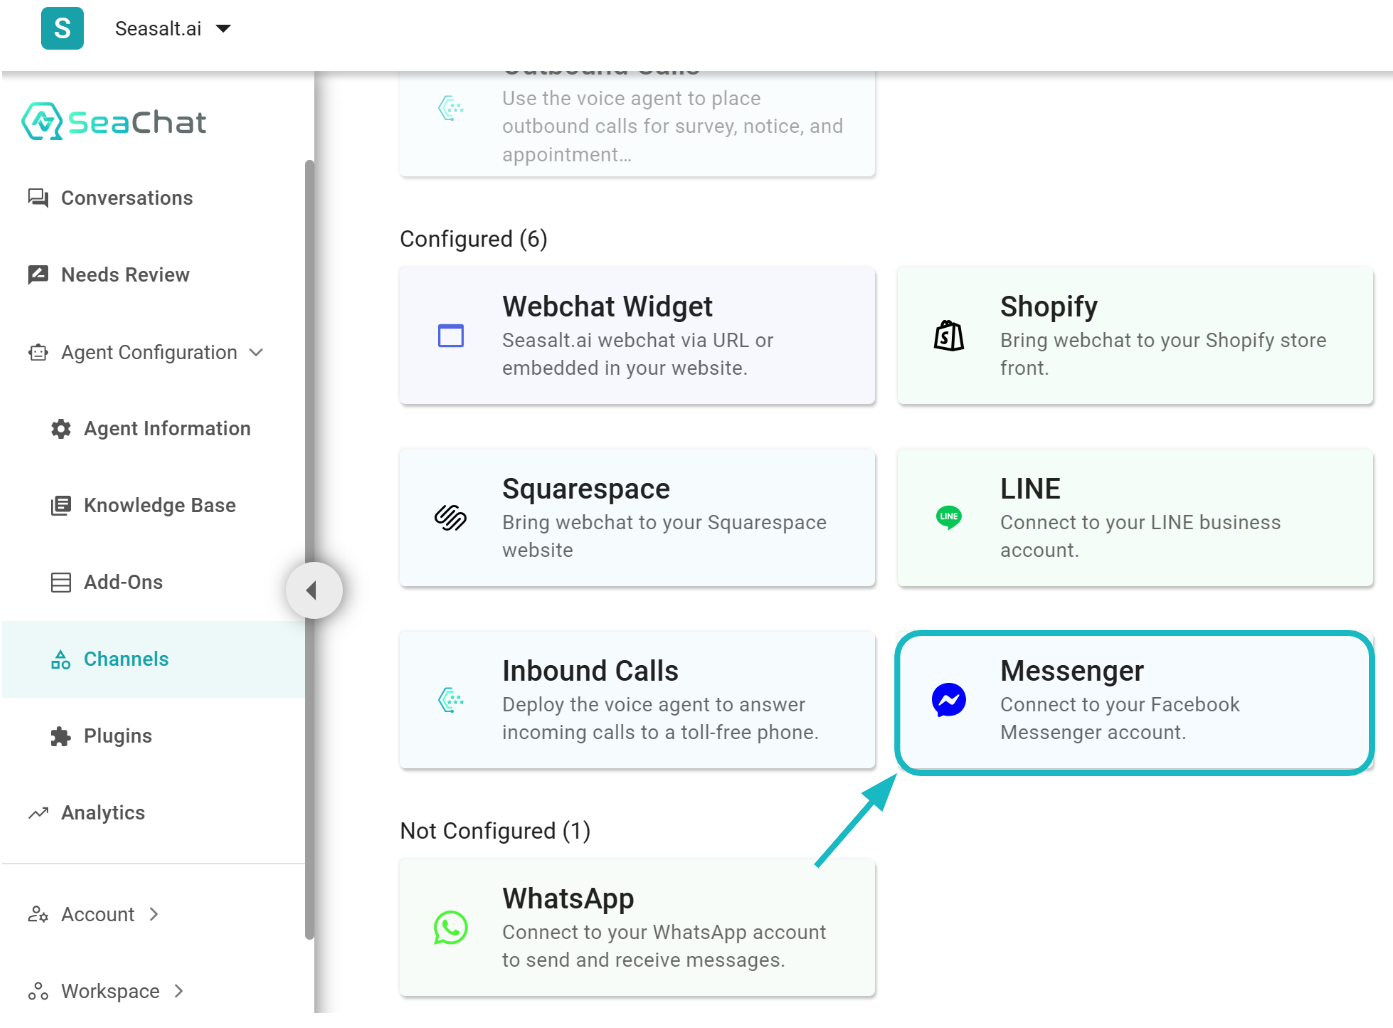
Navigate to Messenger on SeaChat
Copy SeaChat’s Step 1 and paste it to corresponding parts on Messenger dashboard.
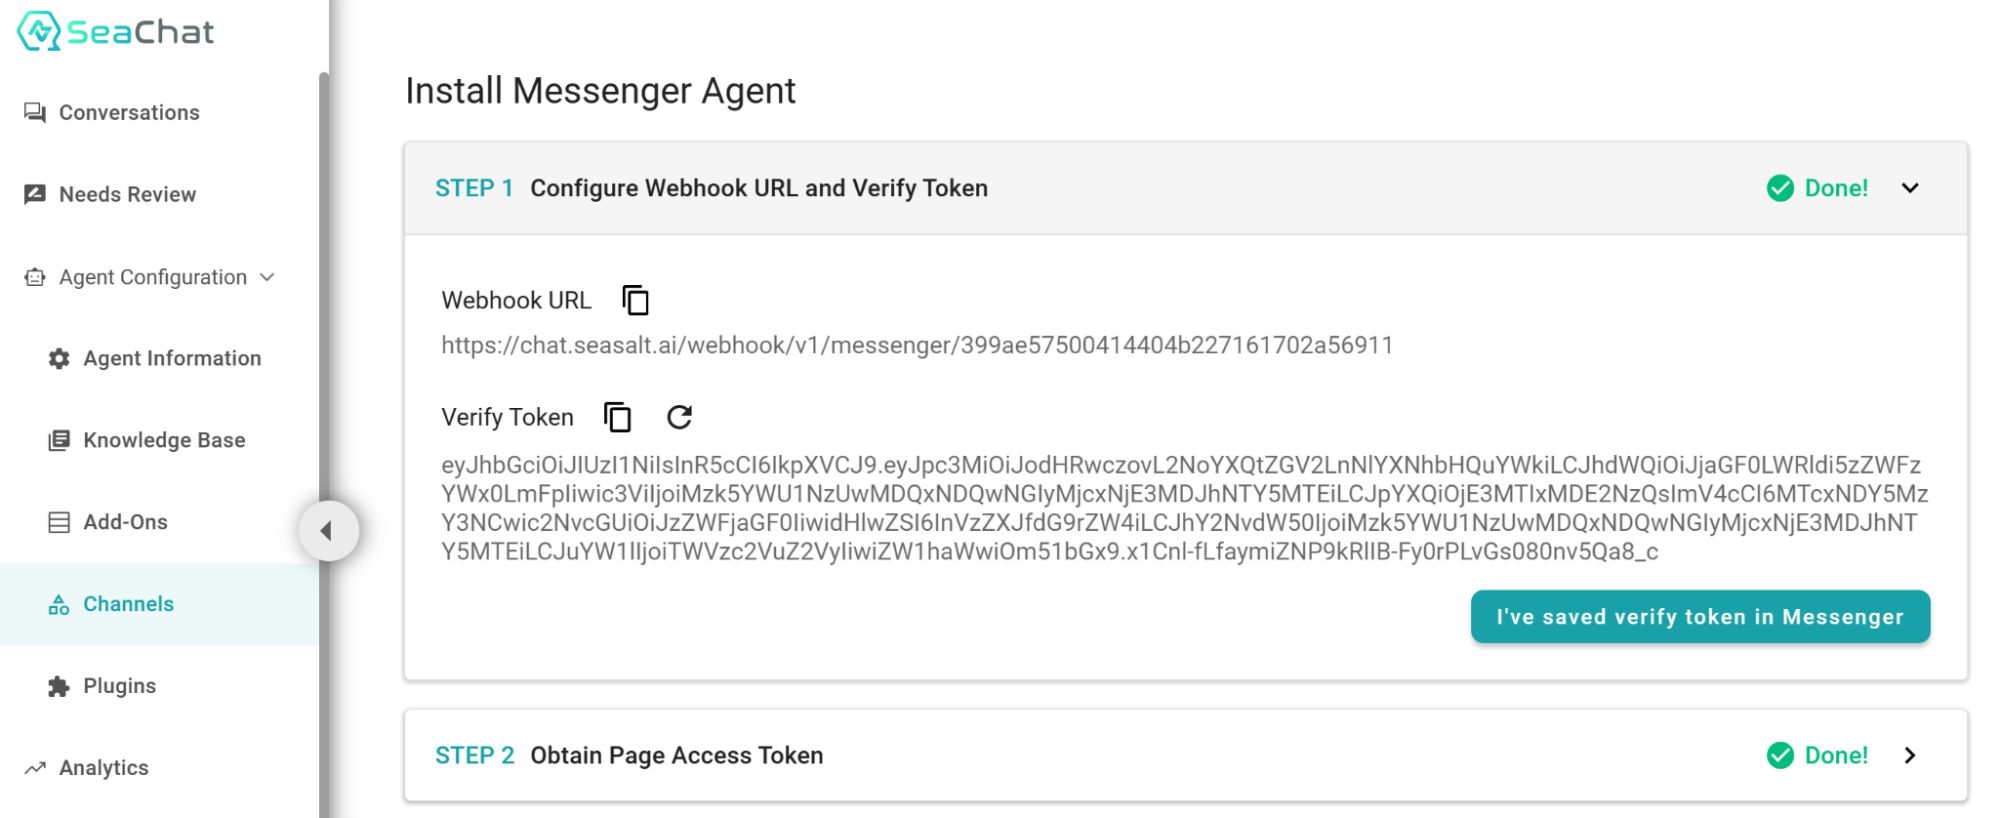
Copy SeaChat info to configure
Paste the Callback URL and Verify token to the corresponding fields on the Messenger dashboard:
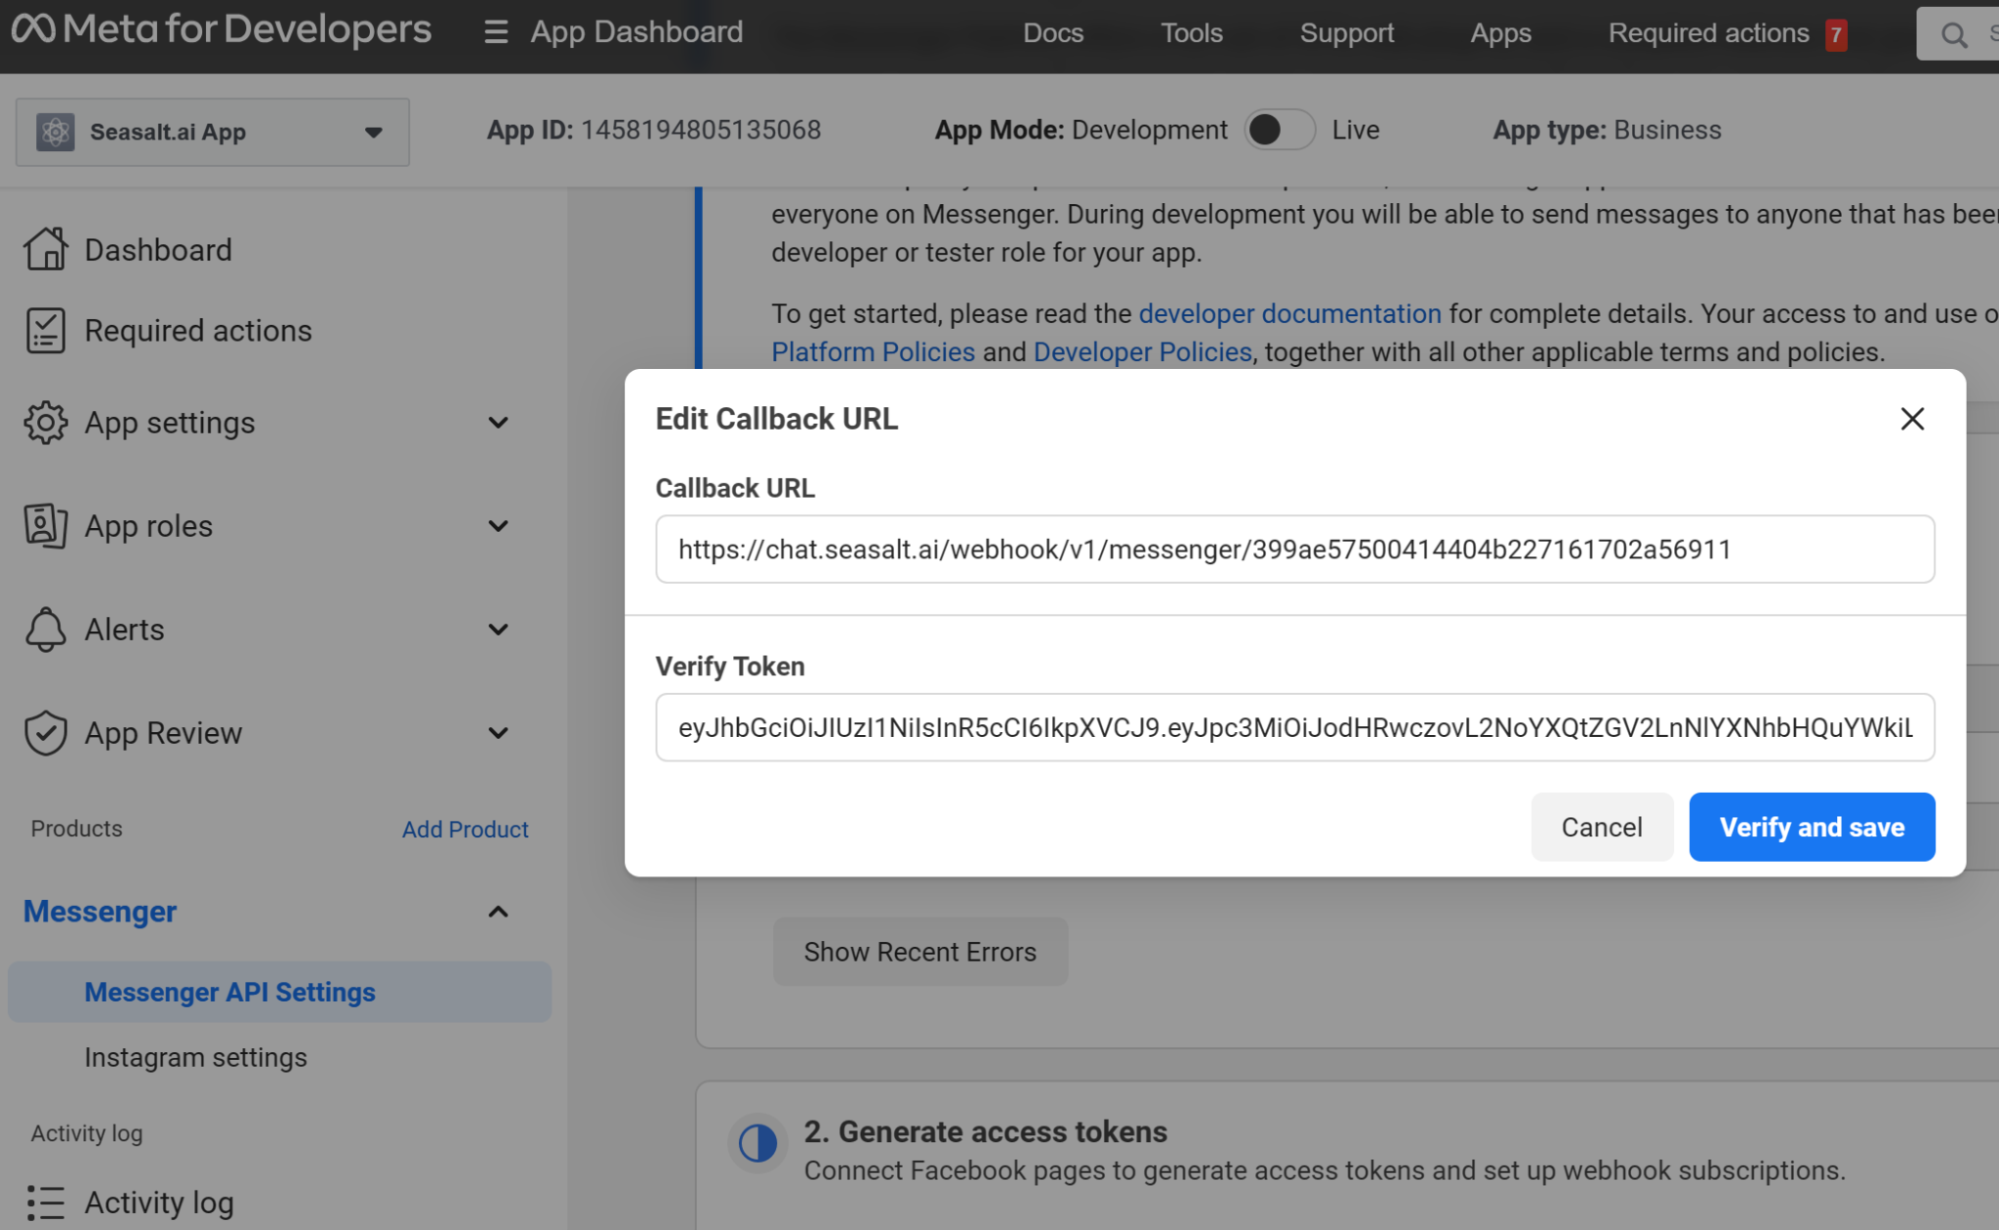
Paste the URL and token
After this, we’ll need to properly configure Webhook Fields to give the right permission to the webhook callback URL:
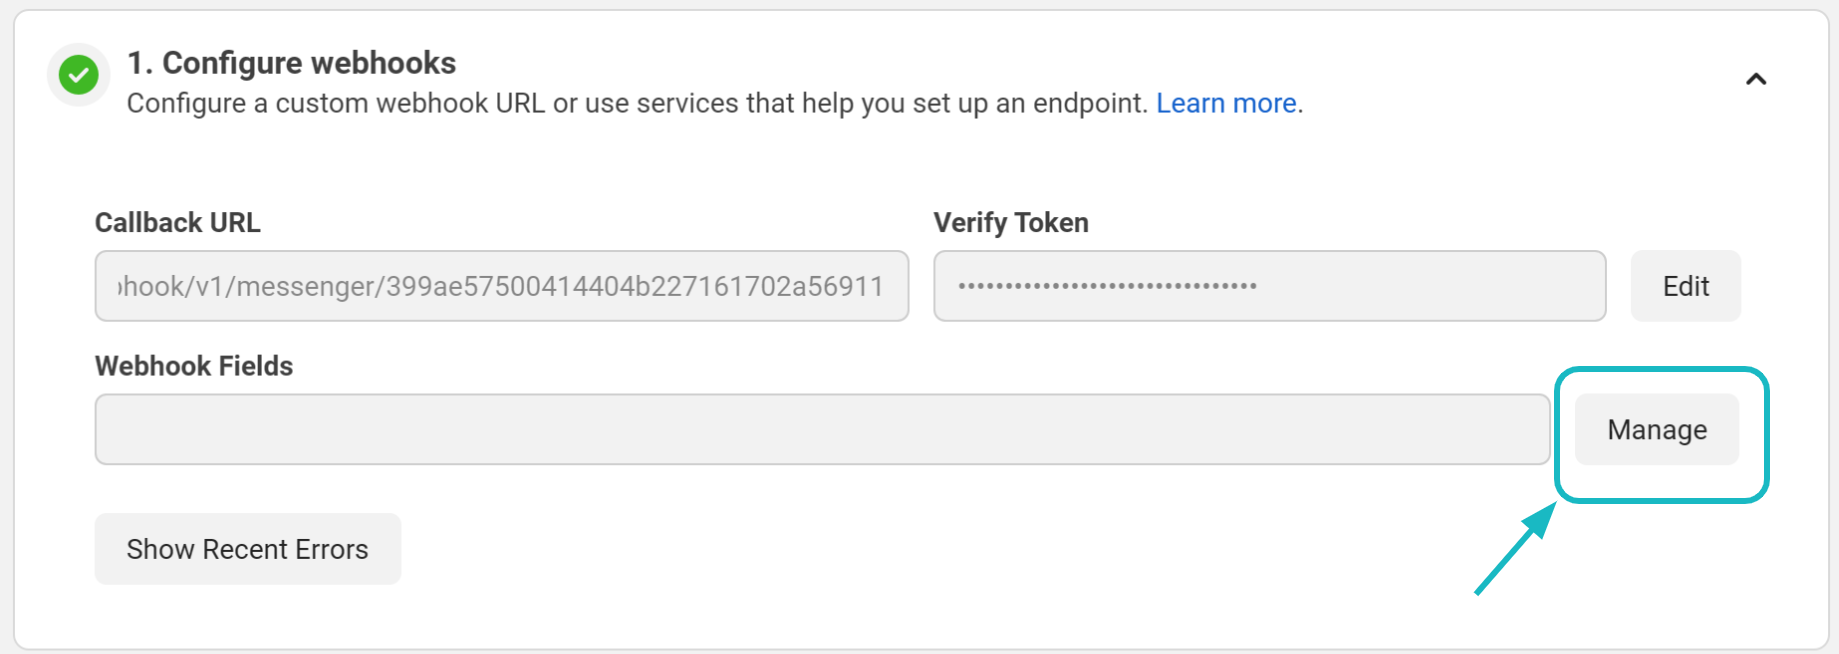
Webhook Fields configuration
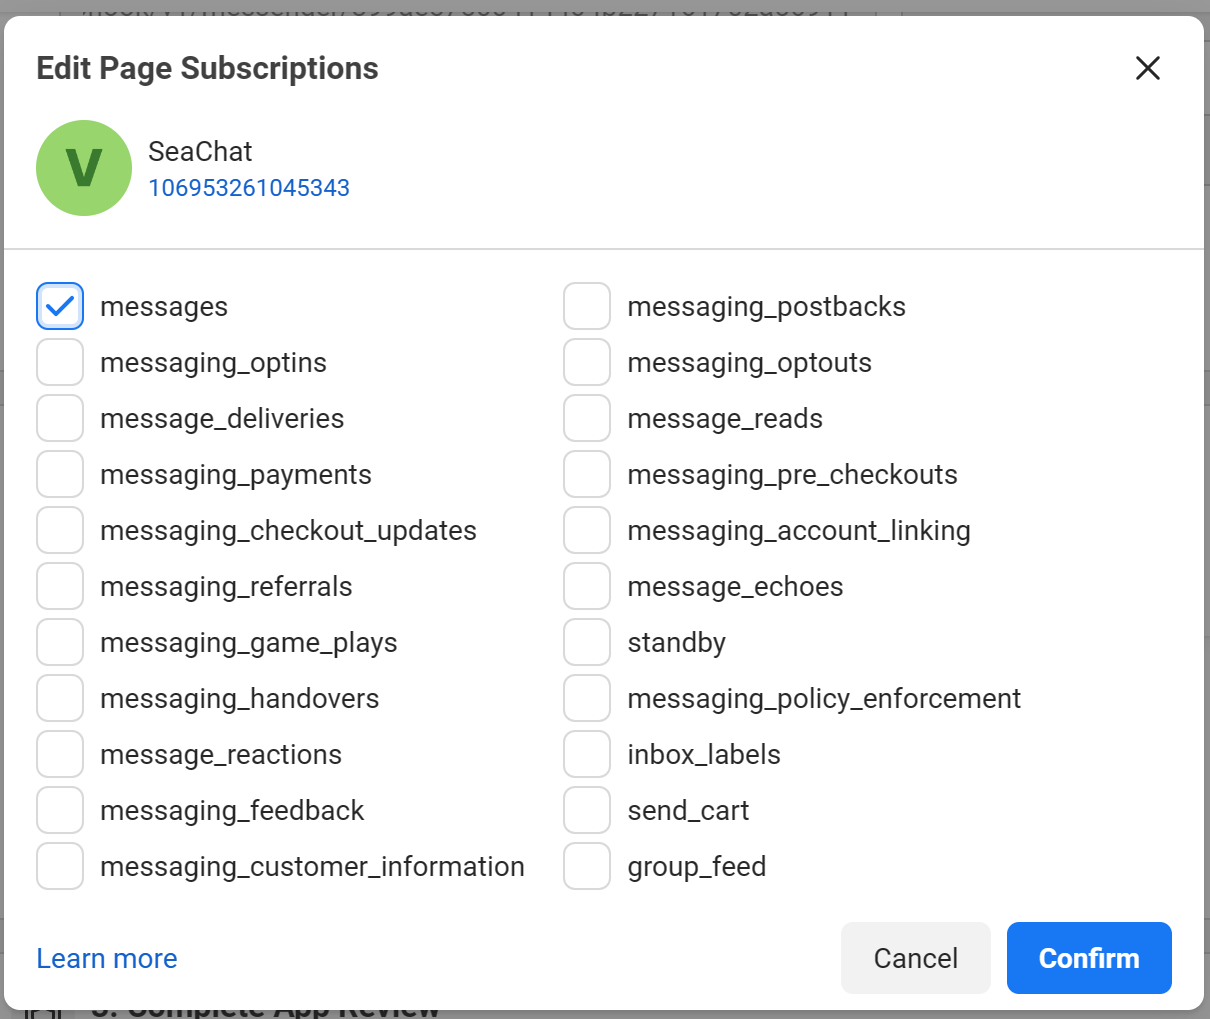
Select messages and click Subscribe:
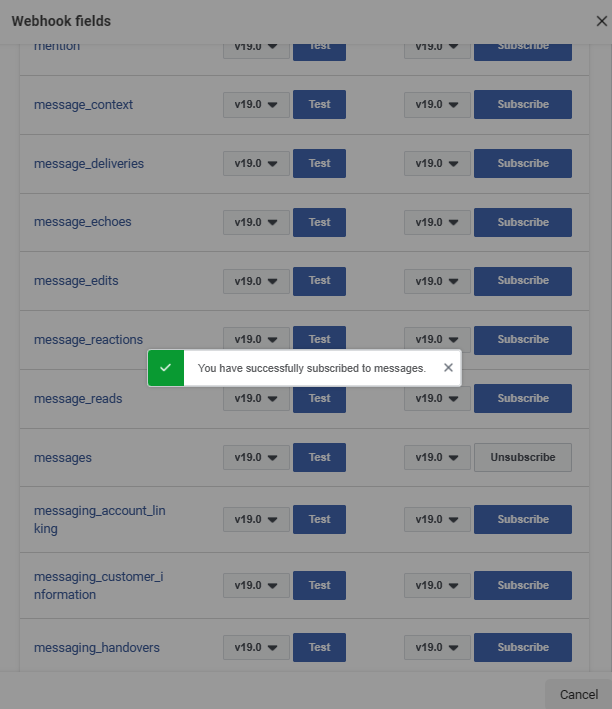
Subscribe selected messages
So your final configuration of webhook would look like this:
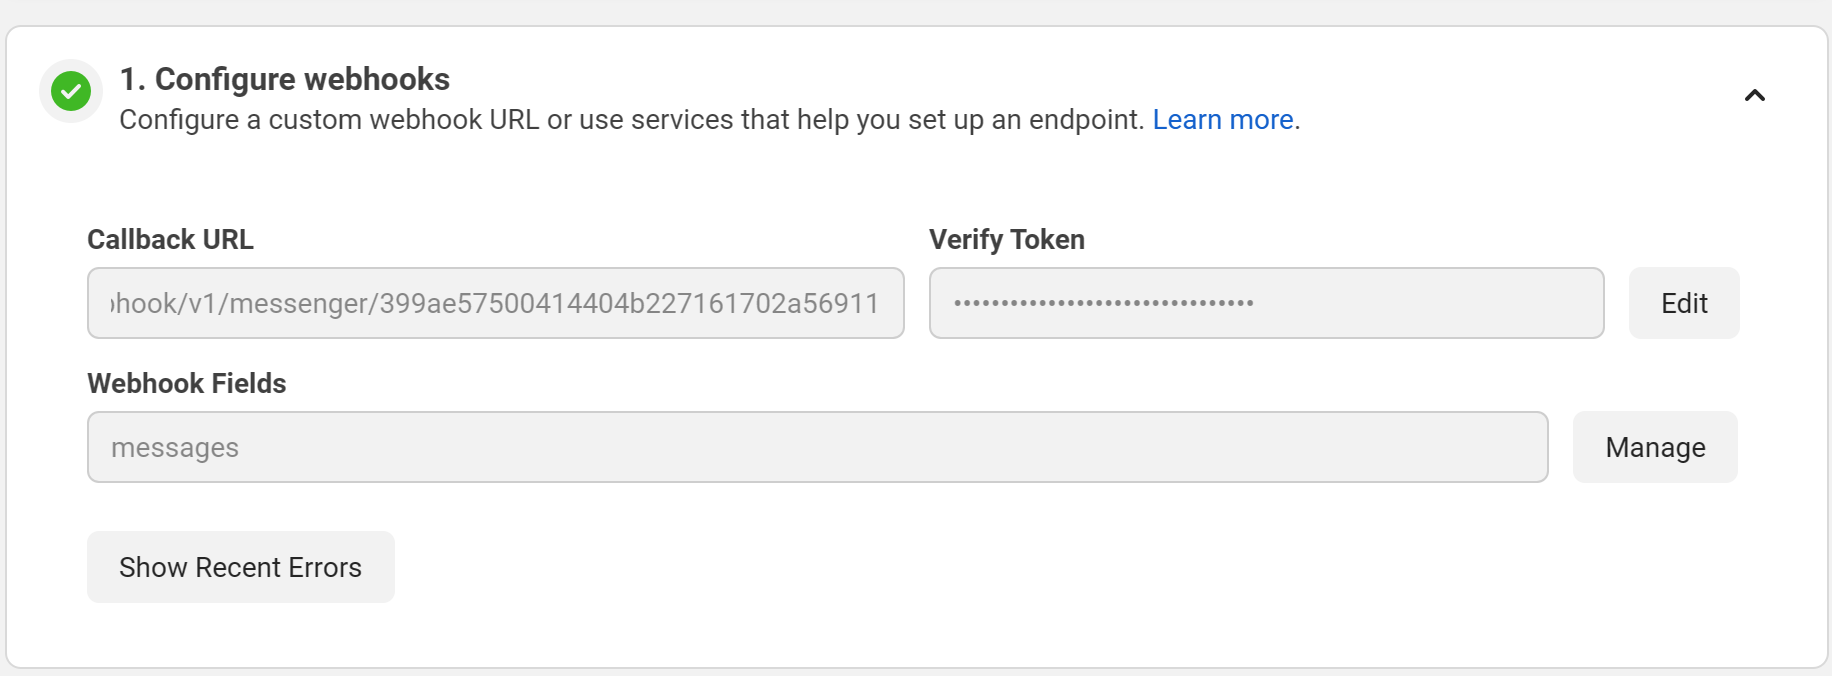
Webhook configuration
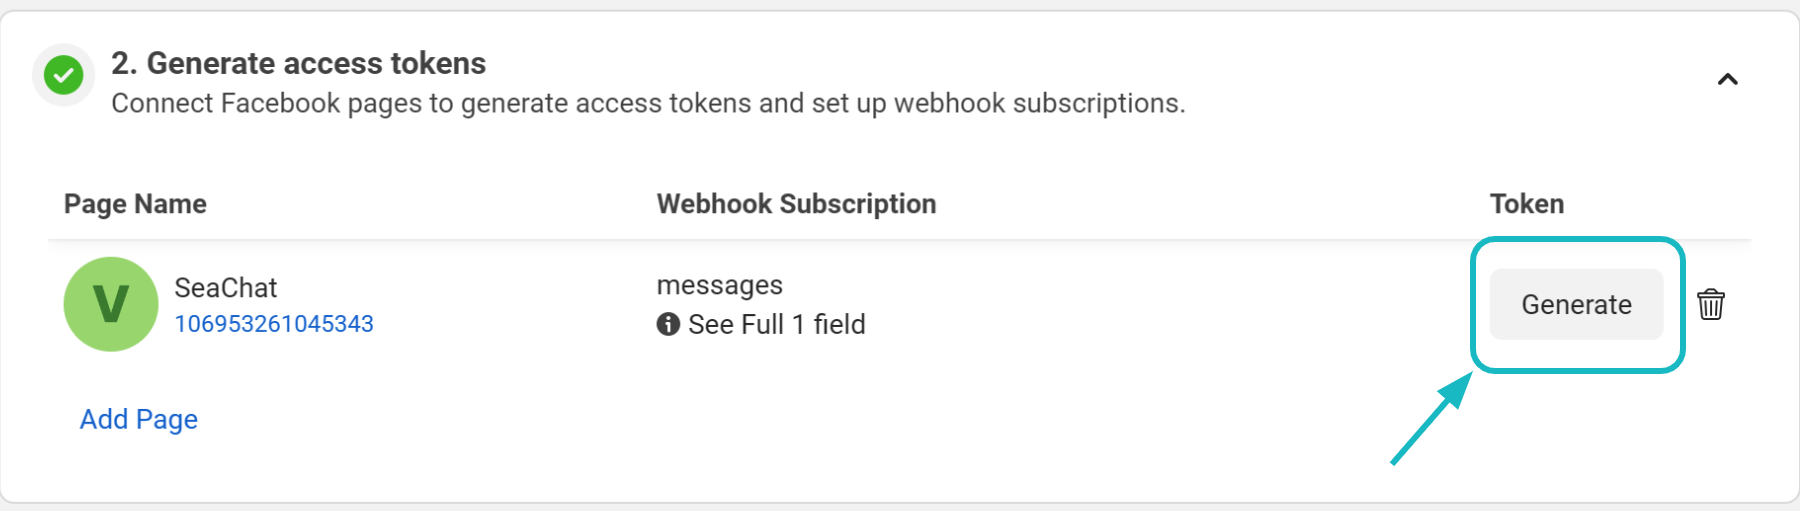
Step 2: Generate Access Token
The Meta app needs to access a certain Facebook Page to be able to receive messages sent from that Page. So in Step 2, you’ll first need to authorize it to access your public Facebook Page.

Generate Access Token
After authorizing with a Facebook Page, you can further Add Subscriptions:

Click on Add Subscription
Again, we want to subscribe to messages:
Choose messages
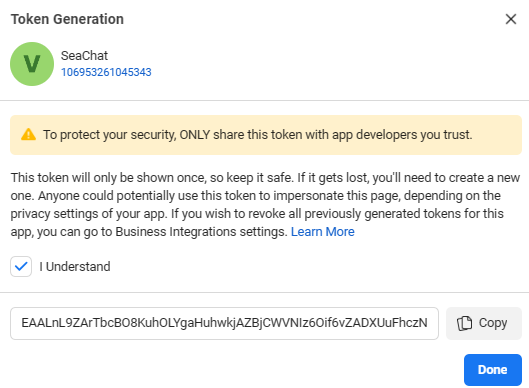
Finally, let’s generate the access token:
Token generation
Once the token is generated, we need to copy the token:
Token details
Paste it to Step 2 of SeaChat Messenger setup:

Paste Token to SeaChat
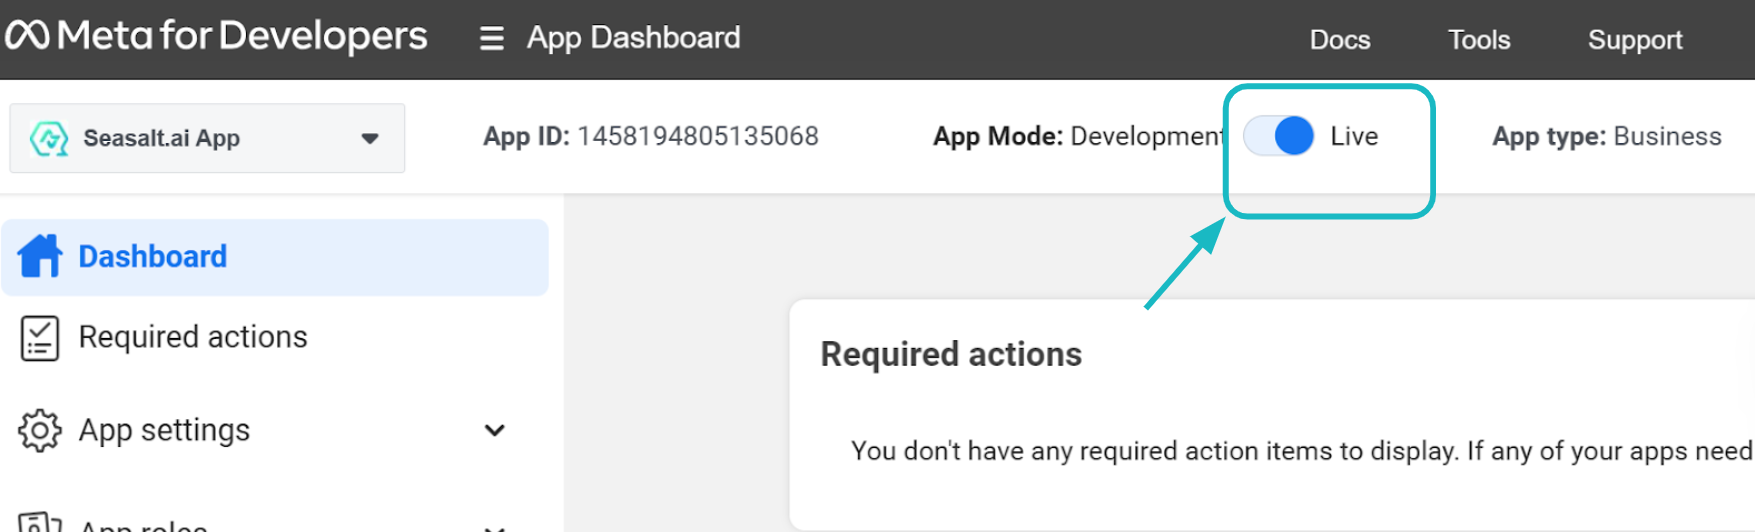
Now turn on your App Mode to be Live and you can chat with the bot:
Live mode
Step 3: Alternative to Complete App Review
So far your messenger bot will respond only to you, the app creator. If you pass it to others, they will not get a response at all. It might be tempting to do “Step 3. Complete App Review” per Facebook’s instructions:
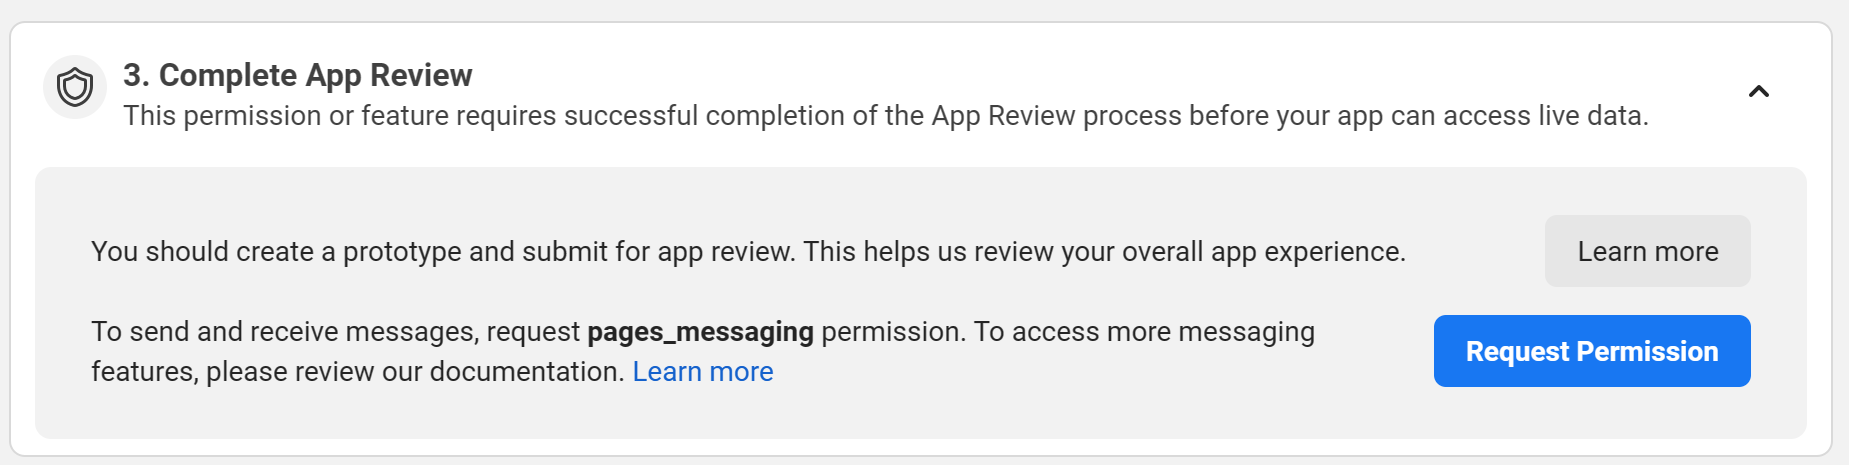
App review
However, It might take up to 5 days to complete the App Review and the process is very cumbersome. For instance, it requires you to take a video walkthrough of the Meta app.
An alternative way is to assign the page to the business you have with Meta. To do so, go to Meta Business Suite, select the business your Meta app was created under, and then go to Accounts → Pages, and make sure that the Facebook Page your chatbot is connected to is there:
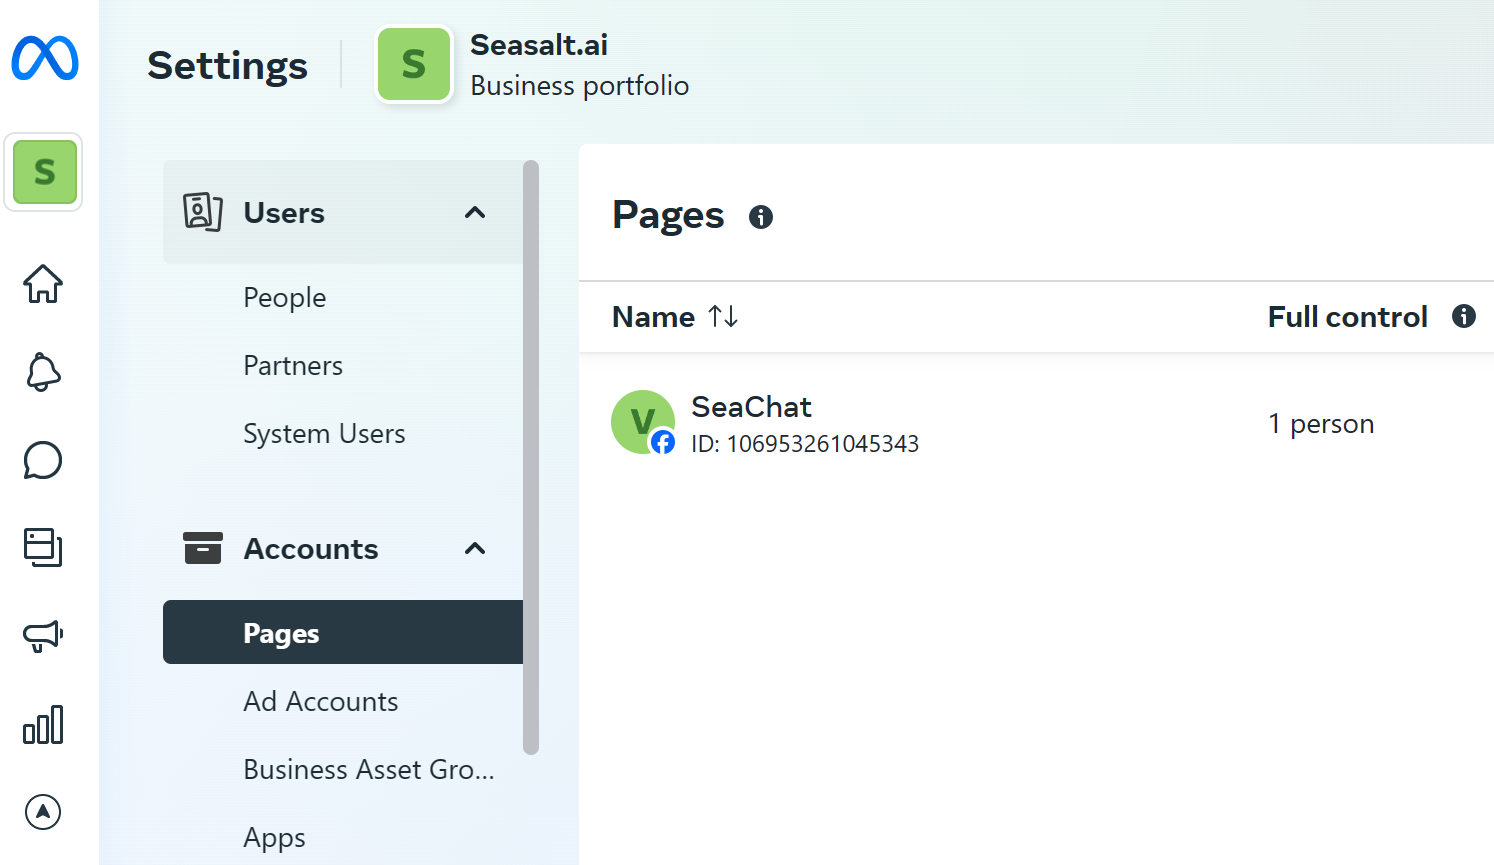
Make sure the Facebook Page shows up under your business
You should now be all set!
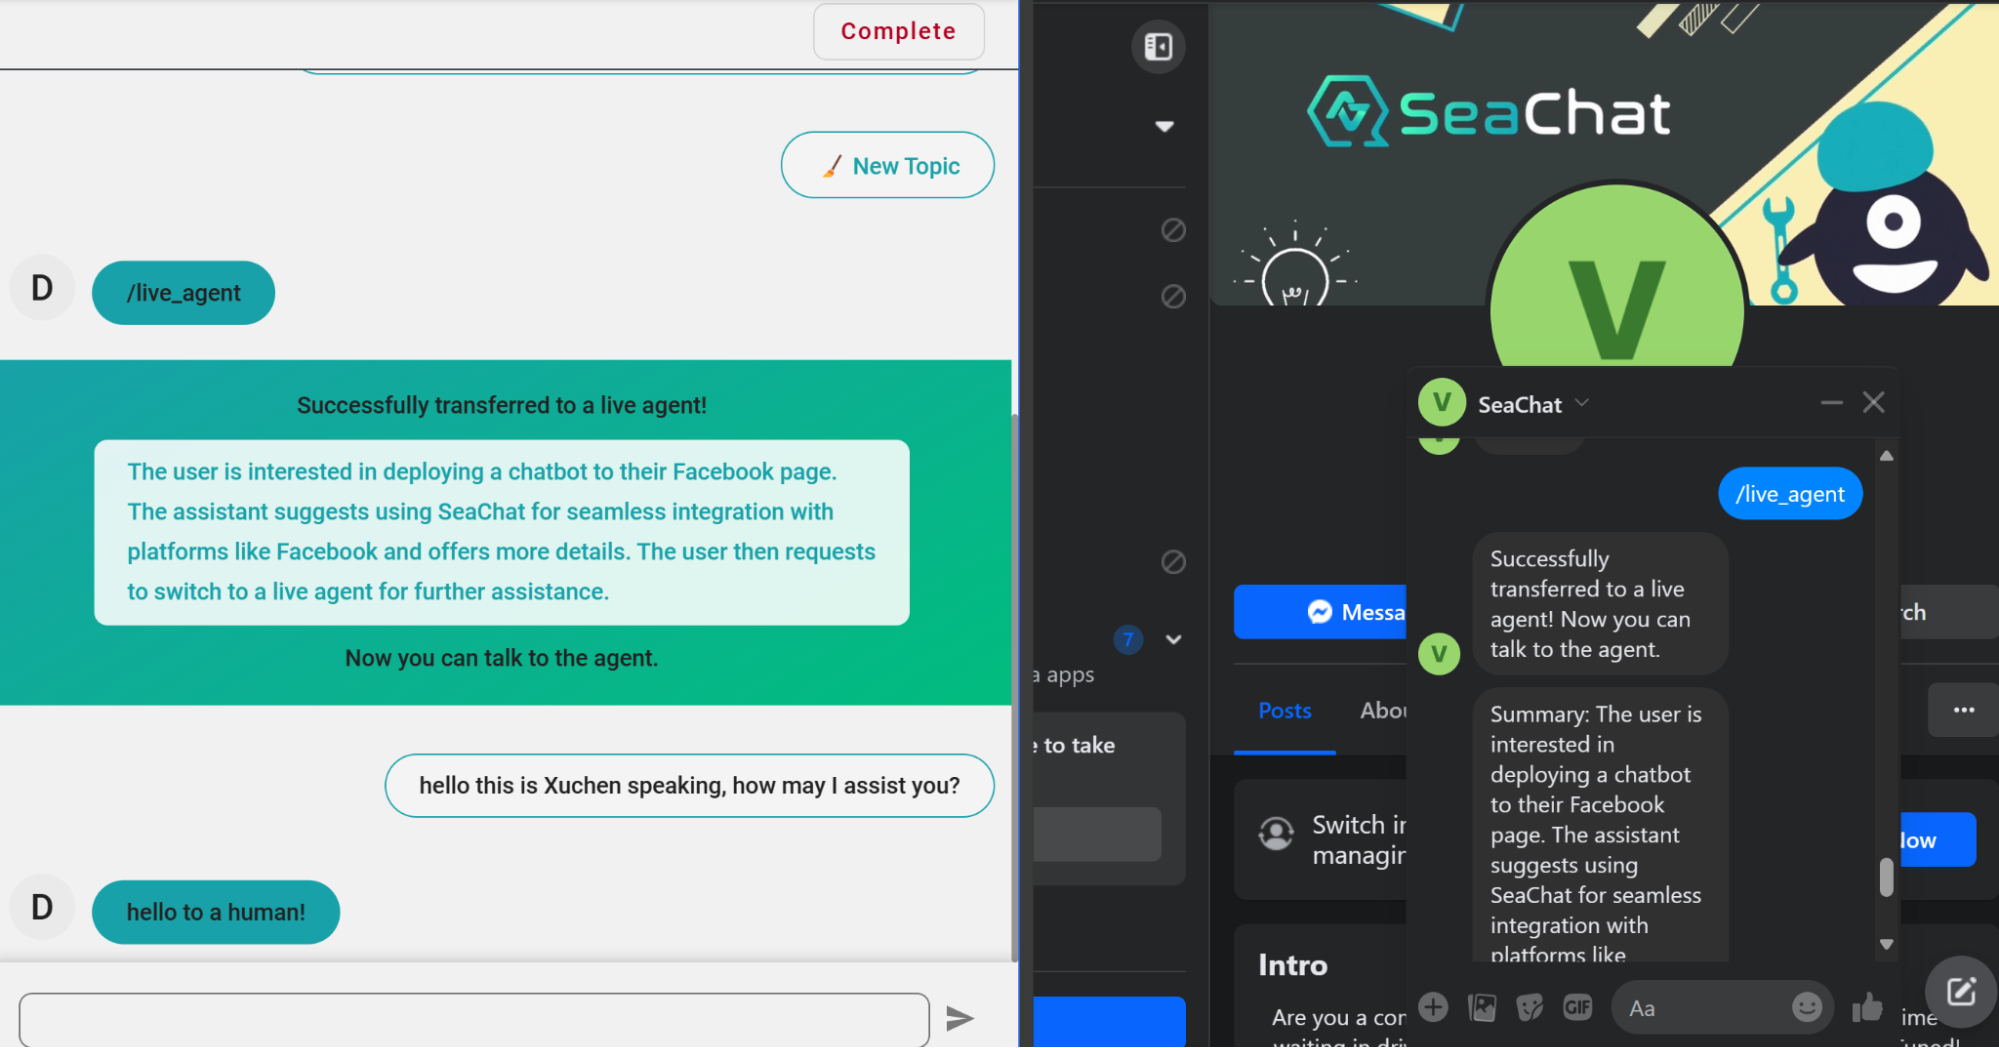
Engage with a real human agent
Did you notice in the above picture that I used /live_agent to request a human agent? If an agent happened to be online by setting their online status:

Live agent status
They can directly talk with the user!
Live agent interaction
If an agent is not online, they can turn on Email notification to receive real-time emails when a user initiates a chat, or request a live agent:
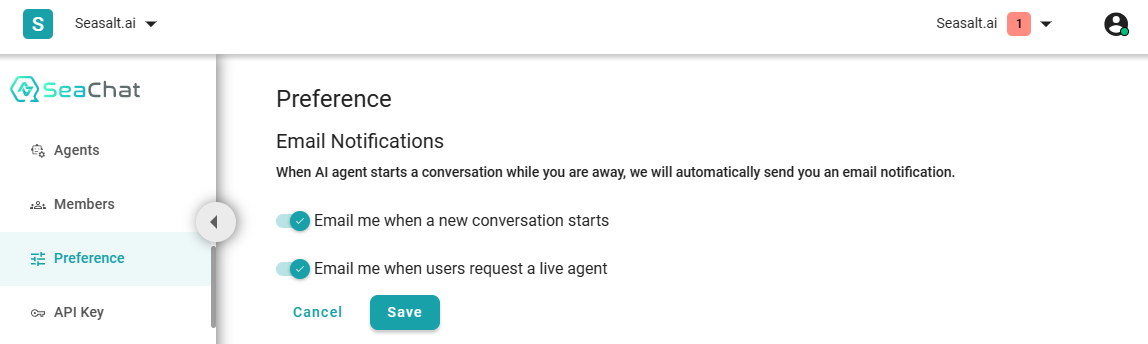
Live agent preference
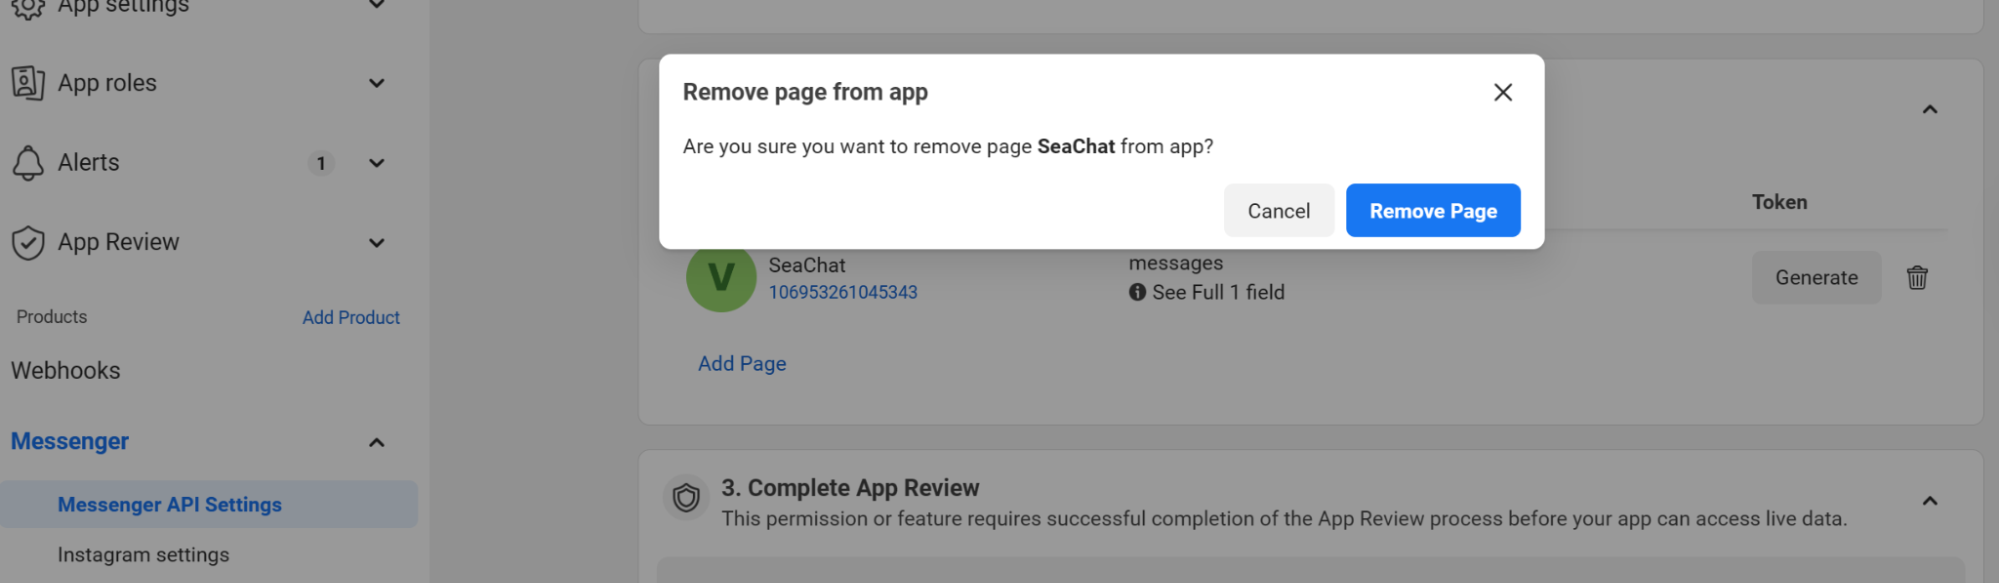
Remove your Messenger Integration
If you want to remove the Messenger integration, you need to do it in two places:
- Properly remove the page access from your Meta app
- Click the Remove button inside SeaChat
For Step 1, please go to your Meta Business app → Messenger → Messenger API Settings → Generate access tokens → remove
Remove integration
Respond to Voice Clips
Do you know that SeaChat supports audio messages too? If a user sends a voice clip, SeaChat can transcribe it to text, and respond via text!
Currently, it supports English speech to transcription, but let us know if you want more languages supported.
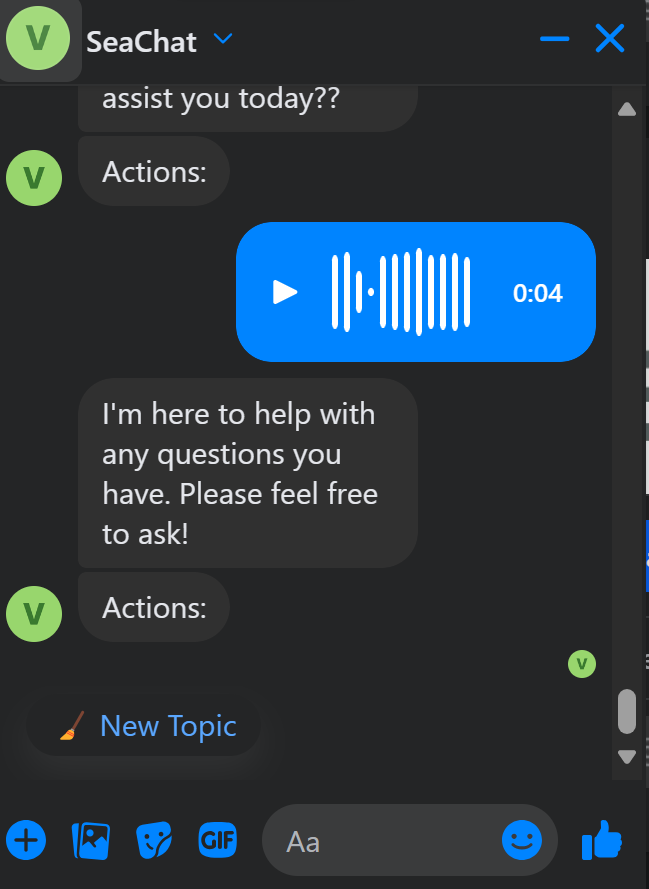
Facebook Messenger voice clip transcription and response by SeaChat
🎯 Troubleshooting
If you have not received responses from SeaChat Agent on Messenger, you should verify the following easily missed settings:
- Has your Messenger application been set to Live mode? Be sure that it is not operating in Development mode.
- Did you configure the webhook fields to allow the message permission? If this permission is not properly granted, SeaChat will be unable to receive messages from messegner.
Support
Need assistance? Contact us at seachat@seasalt.ai.